Firefox OF 빌드 코드를 받기 전에, 빌드 환경을 먼저 구축 하셔야 합니다. 현재까지는 리눅스 64비트 버젼 및 맥 OS X에서만 빌드 하실 수 있습니다.
Note: Firefox OS를 올리기 위한 스마트폰을 빌드 시작전에 컴퓨터에 연결하지 마십시오, 언제 연결할지 알려 줄 것입니다.
지원되는 단말기 및 에뮬레이터
몇몇의 단말기가 지원되기도 하지만, 어떤 단말기에서는 다양하게 변경이 가능합니다. 지금까지는 특별한 목적(특징)으로 분류되어 있습니다. 그리고 어떤 기기는 다른 기기들보다 지원이 더 잘되기도 합니다.
분류1
분류1 에 속하는 기기는 개발의 주요 대상이 되는 기기며 전반적으로 기능의 첫 번째 구현 대상 혹은 최신 버그들이 처음으로 수정되는 대상 기기입니다.
- 오토로
- 오토로는 중저가 스마트폰의 플랫폼 개발 혹은 테스트용으로 사용됩니다. 많은 핵심 Firefox OS개발에 사용되는 기기입니다
- 에뮬레이터 (ARM and x86)
- 에뮬레이터는 ARM코어와 X86(PC용)코어 두가지가 있습니다.
- Koen
- Keon은 Geeksphone의 초기의 개발자 폰중에 하나 입니다. Koen은 Geeksphone에서 빌드 방법을 제공합니다.
- 데스크탑
- 데스크탑용 Firefox OF도 있습니다; 이는 XULRunner application에서 Gecko를 실행 하는 것이며, Gaia user experience를 Gecko에서 사용 가능합니다.
- Flame
- Flame은 Mozilla의 새로운 표준 Firefox OS의 기준 폰입니다. ZTE Open C를 위한 빌드를 할 때 Flame의 설정을 사용해야 합니다. Flame과 Open C는 안드로이드 젤리빈이 기반 시스템 입니다.
당연히, 데스크탑 클라이언트를 빌드 할 수 있으며 단말기 없이도 에뮬레이터를 사용할 수 있습니다..
분류 2
분류 2의 단말기들은 기본기능 개발을 위해(특히 어플리케이션 개발자들) 사용 됩니다. 그렇기 때문에 분류 1다음으로 최신 코드들이 반영됩니다.
- Samsung Nexus S
- 넥서스 S로 잘알려진 모델로 상세 모델로는 GT-I9020A, GT-I9023이기도 합니다. 그외 넥서스 S모델들도 사용 가능합니다.
- Samsung Nexus S 4G
- 모델명 SPH-D720가 분류 2에 포함 됩니다.
분류 3
Firefox OS가 아래와 같은 단말기 들로 빌드 될 수도 있지만, 코어 개발 및 기본 기능들이 실제로 잘 반영되지 않아 정상적으로 동작 하지 않을 수도 있습니다. 분류 1, 2보다 안정성이 떨어지므로 참고하시기 바랍니다.
- Samsung Galaxy S2
- 모델 명 i9100; 다른 모델은 호환되지 않을 수 있습니다. (NFC칩만 추가된 i9100P모델인 경우에는 동작 할 수 있습니다.)
- Samsung Galaxy Nexus
- 최근에는 지원되지 않는 모델입니다.
- Nexus 4
- IRC에 일부 사용자들이 성공적으로 테스트를 했습니다. Android 4.4를 처음으로 실행 하면 Android 4.3을 재 Flash를 요구 할 수 도 있고 그렇지 않을 수 도 있습니다.( 안드로이드 이미지는 구글로 부터 이용할 수 있다.)
- Nexus 5
- IRC에 일부 사용자들이 성공적으로 테스트를 했습니다.
- Tara
- Tara is another testing device. Manifest of Tara is in master branch only. The script of getting Tara code is "BRANCH=master ./config.sh tara".
- Unagi
- 우나기는 중저가 스마트폰의 플랫폼 개발 혹은 테스트용으로 사용됩니다. 많은 핵심 Firefox OS개발에 사용되는 기기입니다.
- 판다보드
- 판다보드는 모바일용 플랫폼으로 사용되는 OMAP 4 시스템용 보드 개발용으로 사용됩니다.
분류 2와 분류 3 단말은 홈 버튼이 없다
분류 1의 모든 단말은 하드웨어 홈 버튼이 있어서 사용자가 홈 스크린으로 돌아갈 수 있습니다. 최근 대부분의 ICS 안드로이드 단말은 네비게이션을 위해서 화면상에 소프트웨어 홈 버튼을 사용합니다. 카메라 앱 같이 몇몇 앱에서는 하드웨어 홈버튼 없이 앱을 빠져나올 수 없습니다. 이것은 FireFox OS가 매일매일 사용하는데 부적절할 수 있게 합니다.
리눅스 요구사항
리눅스에서의 빌드 환경은 아래와 같습니다:
- An installed 64 bit GNU/Linux distribution (추천 버전 : 우분투 12.04).
- 최소 4 GB 램/스왑 공간.
- 최소 20 GB 이상의 하드 공간.
위의 사항은 단순히 최소사양이며, 가끔은 리소스가 없어서 빌드 실패가 되기도 합니다.
다른 리눅스 배포판에서도 빌드가 될수도 있으나, 우분투 12.04 배포판에서는 대부분의 개발자들이 빌드에 성공 했으므로 이를 추천 합니다. 아래 배포판들은 다음과 같은 이유로 빌드 되지 않을 수 있습니다.: 32 비트 디스트로 와 최신 디스트로( 우분투 12.10, 페도라 17/18, 아크 리눅스의 gcc 4.7으로 인해 오류 발생 가능성 있음).
그외 아래와 같은 툴들이 설치 되어 있어야 합니다:
- autoconf 2.13
- bison
- bzip2
- ccache
- curl
- flex
- gawk
- git
- gcc / g++ / g++-multilib (4.6.3 or older)
- make
- OpenGL headers
- X11 headers
- 32-bit ncurses
- 32-bit zlib
64 비트에서의 설치 예시:
우분투 12.04 / 리눅스 민트 13 / 데비안 6
$ sudo apt-get install autoconf2.13 bison bzip2 ccache curl flex gawk gcc g++ g++-multilib git ia32-libs lib32ncurses5-dev lib32z1-dev libgl1-mesa-dev libx11-dev make zip
64비트 우분투에서 빌드할때는, 32비트 버전의 libX11.so와 libGL.so를 심볼릭 링크로 추가 하셔야 합니다.
$ sudo ln -s /usr/lib/i386-linux-gnu/libX11.so.6 /usr/lib/i386-linux-gnu/libX11.so
$ sudo ln -s /usr/lib/i386-linux-gnu/mesa/libGL.so.1 /usr/lib/i386-linux-gnu/libGL.so
우분투 12.10
$ sudo apt-get install autoconf2.13 bison bzip2 ccache curl flex gawk gcc g++ g++-multilib gcc-4.6 g++-4.6 g++-4.6-multilib git ia32-libs lib32ncurses5-dev lib32z1-dev libgl1-mesa-dev libx11-dev make zip
위의 단계 외 추가로, 빌드 하기 전에 GCC 4.6를 기본 호스트 컴파일러로 설정 하여야 합니다. 소스를 가저 온 후에는 "여기" 참고 하세요.
최신 우분투 12.10을 설치 한후, "unmet dependenceis for ia32-libs"에러가 발생 할 것입니다. 아래와 같이 수행 하여 수정 하시기 바랍니다.
sudo dpkg --add-architecture i386
sudo apt-get update
sudo apt-get install ia32-libs
Fedora 16:
$ sudo yum install autoconf213 bison bzip2 ccache curl flex gawk gcc-c++ git glibc-devel glibc-static libstdc++-static libX11-devel make mesa-libGL-devel ncurses-devel patch zlib-devel ncurses-devel.i686 readline-devel.i686 zlib-devel.i686 libX11-devel.i686 mesa-libGL-devel.i686 glibc-devel.i686 libstdc++.i686 libXrandr.i686 zip
Fedora 17/18:
$ sudo yum install autoconf213 bison bzip2 ccache curl flex gawk gcc-c++ git glibc-devel glibc-static libstdc++-static libX11-devel make mesa-libGL-devel ncurses-devel patch zlib-devel ncurses-devel.i686 readline-devel.i686 zlib-devel.i686 libX11-devel.i686 mesa-libGL-devel.i686 glibc-devel.i686 libstdc++.i686 libXrandr.i686 zip
위와 같이 프로젝트는 컴파일 하려면 GCC 4.4가 필요합니다. 여기서 미리 컴파일된 버전을 구할 수 있으니 아래 명령을 따라 다운로드후 /opt에 설치하세요:
$ wget https://people.mozilla.org/~gsvelto/gcc-4.4.7-bin.tar.xz
$ sudo tar -x -a -C /opt -f gcc-4.4.7-bin.tar.xz
이 컴파일러를 항상 호스트의 기본 컴파일러로 지정한 후에 빌드 작업을 해야합니다. 소스를 얻은 후에 here를 따라 확인해 주세요.
Arch Linux (not functional yet):
$ sudo pacman -S --needed alsa-lib autoconf2.13 bison ccache curl firefox flex gcc-multilib git gperf libnotify libxt libx11 mesa multilib-devel wireless_tools yasm lib32-mesa lib32-ncurses lib32-readline lib32-zlib
기본적으로 Arch 리눅스는 Python3을 사용하는데 이것을 이전 Python2로 사용해야 합니다:
$ cd /usr/bin

$ sudo ln -fs python2 python
Mac OS X를 위한 요구사항
Mac OS X에서 Firefox OS를 빌드하기 위해서 Xcode 명령라인 도구들을 설치해야 합니다.
Apple's developer downloads page 에서 OS X의 특정 버전에 적절한 명령라인 도구를 바로 다운로드 해서 사용할 수 있습니다.
그러나 Xcode 전체를 사용하고자 하면 Mac App Store에서 설치할 수 있습니다.
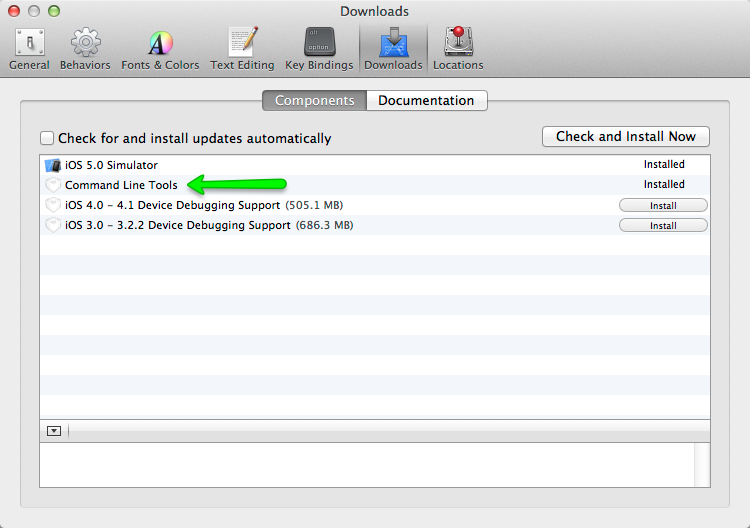
XCode 4.3.1 이상 최신버전에서 명령라인 도구 설치하기
Xcode 4.3.1(OS X 10.7 "Lion")과 최신 4.4.1+(Mac OS X 10.8 "Mountain Lion")은 명령라인 도구를 포함하고 있지 않습니다. Xcode의 Preferences 메뉴로 가서 Downloads 패널로 갑니다. 이곳에서 'Command Line Tools'를 설치합니다. 설치를 위해서 최소 20 GB 공간의 여유가 있어야 합니다.
Firefox OS Mac Bootstrap
터미널을 열고 아래 명령을 실행합니다:
curl -fsSL https://raw.github.com/mozilla-b2g/B2G/master/scripts/bootstrap-mac.sh | bash
It will pull and run a bootstrap script that makes sure you have all the prerequisites met to build the emulator. It will also prompt you for permission to install anything you're missing. The script will check for and install the following items:
gitgpgccacheyasmautoconf-213gcc-4.6homebrew
Xcode
If you have already upgraded to Xcode 4.4+ and get the message that Xcode is outdated, check the Xcode path with:
xcode-select -print-pathIf it still points to
/Developer you can update the path with:
sudo xcode-select -switch /Applications/Xcode.appNext to that be sure that you have the Mac OS X 10.6 SDK available at:
/Applications/Xcode.app/Contents/Developer/Platforms/MacOSX.platform/Developer/SDKs/
If it cannot be found there you will need to extract and copy it from the Xcode 4.3 DMG file which is available at the Apple Developer portal. You can use the utility Pacifist to extract the 10.6 SDK. Be sure to add a symlink to it to the /Applications/Xcode.app/Contents/Developer/Platforms/MacOSX.platform/Developer/SDKs/ directory. (We can drop the 10.6 SDK requirement after bug 784227 has been fixed, and our version of platform_build has been updated.)
Mountain Lion
If you are building on OS X 10.8 "Mountain Lion" (Xcode 4.4.1 or later) and encounter the following error:
external/qemu/android/skin/trackball.c:130:25: error: 'M_PI' undeclared (first use in this function)Edit the file:
B2G/external/qemu/Makefile.android and add in line 78:MY_CFLAGS += -DM_PI=3.14159265358979323846264338327950288 #/* B2G_fix: not finding M_PI constant */
clang: error: unable to execute command: Segmentation fault: 11... try reinstalling the dependency manually adding the --use-gcc flag, for example:
brew install mpfr --use-gcc
Samsung Galaxy S2
If you plan to build for the Samsung Galaxy S2, you will also need to install heimdall. See Installing heimdall for details. This is not done for you by the bootstrap script!
~/Library/Application Support/.FUS, and leaves a reference to a utility there in your user startup items list. You will want to remove these manually.hdiutil create -type SPARSE -fs 'Case-sensitive Journaled HFS+' -size 40g ~/firefoxos.dmg
Mount the drive with:
open ~/firefoxos.dmg
Change into the mouted drive with:
cd /Volumes/untitled/
Fix libmpc dependency if broken
gcc 4.6 was built with libmpc 0.9; if you then use homebrew to update packages, libmpc gets updated to version 1.0, but homebrew doesn't rebuild gcc 4.6 after the library version changes. So you need to create a symlink to make things work again, like this:
cd /usr/local/lib/
ln -s libmpc.3.dylib libmpc.2.dylib
Optional: Install HAX
Intel provides a special driver that lets the B2G emulator run its code natively on your Mac instead of being emulated, when you're using the x86 emulator. If you wish to use this, you can download and install it. It's not required, but it can improve emulation performance and stability.
adb 설치
B2G를 단말기에 설치 하기 전에 기존에 단말기에 설치된 안드로이드를 꺼내 저장 해 두시기 바랍니다. 이 를 위해서는 adb(Android Debug Bridge)를 설치 하셔야 합니다.
adb를 설치 하기 위해서는 Android SDK starter package를 데스크 탑에 설치된 OS에 맞는 것을 설치 하셔야 합니다.(ADT Bundle만 설치 하셔도 됩니다). 설치 후, 패키지 메니저를 실행 하여 "Android SDK Platform-tools"를 설치 하세요.
adb는 $SDK_HOME/platform-tools에 설치 될 것입니다. 설치 후에는 PATH에 아래 경로를 추가 하세요.
PATH=$SDK_HOME/platform-tools:$PATH
~/.bashrc파일에 $SDK_HOME가 있으면 그 경로를 자신이 설치한 Android sdk의 경로로 대체 하세요.없을시는 환경 설정을 추가 하세요. 그리고 아래와 같이 실행 하시면 단말기의 Android 전체 system폴더의 내용을 원하는 backup target dir로 가져옵니다:
adb pull /system <backup target dir>/system
이는 나중에 B2G를 제거 하고 Android로 복원할 수 있습니다. 단말기에 따라 /data폴더와 /vendor폴더도 복사 해야 하는 경우도 있습니다.
adb pull /data <backup target dir>/data
adb pull /vendor <backup target dir>/vendor
"권한 없음(insufficient permission)"메시지와 함께 복사가 되지 않는 경우, adb server를 제 실행 해 보거나, adb tool에 루트권한(root permissions)이 주어졌는지 확인 하세요. (eg. under CyanogenMod, change 'Settings > System > Developer Options > Root Access' to 'Apps and ADB' or 'ADB only').
Install heimdall
Heimdall is a utility for flashing the Samsung Galaxy S2. It's used by the Boot to Gecko flash utility to replace the contents of the phone with Firefox OS, as well as to flash updated versions of B2G and Gaia onto the device. You'll need it if you want to install Firefox OS on a Galaxy S2; it is not needed for any other device. For other devices, we build and use the fastboot utility instead.
There are two ways to install heimdall:
- You can download the code GitHub and build it yourself.
- Use a package manager to install it.
- On Linux:
sudo apt-get install libusb-1.0-0 libusb-1.0-0-dev - On Mac, you can download an installer package and use that.
- On Linux:
ccache 설정 변경
기본 ccache 크기는 1GB로 되어 있습니다. B2G 빌드시 이는 부족한 크기이므로 아래와 같이 크기를 변경 해야 합니다.
$ ccache --max-size 3GBudev rule에 개발 단말기 환경 추가
"lsusb"를 실행하면 현재 연결된 단말기의 USB vendor ID를 보실 수 있습니다.대부분의 구글 단말기는 "18d1"이며, 삼성은 "04e8", ZTE는 "19d2"이므로 /etc/udev/rules.d/51-android.rules파일(해당 파일이 없으면 생성하세요)에 아래 "xxxx"부분에 해당 단말기의 id로 변경하여 추가 하세요.
SUBSYSTEM=="usb", ATTR{idVendor}=="XXXX", MODE="0666", GROUP="plugdev"
ZTE단말기를 예로 들면, 51-android.rules파일에 아래와 같이 추가하세요.
SUBSYSTEM=="usb", ATTR{idVendor}=="19d2", MODE="0666", GROUP="plugdev"
위와 같이 추가 한 후에는 저장, 종료 후에 "읽기 모드"를 아래와 같이 변경해 주세요.
$ sudo chmod a+r /etc/udev/rules.d/51-android.rules
위와 같이 추가 한 후에는 adb명령을 수행 하면 아래와 같이 단말기를 adb에서 인식 할 수 있게 됩니다.
$adb devices
List of devices attached
123456          device
단말기를 개발자 모드로 바꾸기
단말기를 USB에 연결하기 전에 아래와 같은 메뉴에서 단말기를 개발자 모드로 변경 하세요. 개발자 모드를 바꾸고 나면 디버깅과 단말기로 다운로드를 하실 수 있습니다. 설정(Settings) -> 단말기 정보(Device information) -> 모드 정보(Mode Information) -> 개발자(Developer) -> 개발자 모드(enable) Developer mode
다음 단계로
이제 Firefox OS코드를 가져올 단계로 넘어 가겠습니다.