Este artículo explora la plataforma Mozilla mediante la construcción de una aplicación de escritorio básico utilizando XULRunner. Dado que Firefox, Thunderbird y otras múltiples aplicaciones se escriben utilizando la plataforma, es una apuesta segura que se puede utilizar para crear una aplicación básica. Hay un artículo con un enfoque más complicado de construir aplicaciones XULRunner en Creación de aplicaciones XULRunner con el Sistema de Mozilla Build. Si necesita cambiar la propia XULRunner o integrarlo con código binario externo puede que tenga que leer este artículo.
Paso 1: Descargar XULRunner
Usted puede encontrar un enlace de descarga en la página principal XULRunner aquí en MDC. Dado que no estamos creando ningún componente XPCOM binarios, sólo tenemos que descargar e instalar el paquete de tiempo de ejecución XULRunner, no el SDK.
La descarga de XULRunner para Windows es un archivo .zip, no un archivo ejecutable. Como desarrollador, me gusta la idea de que XULRunner sólo necesita ser descomprimido en mi máquina. Supongo que no es necesario conectar a mi sistema de Windows y eso es una buena cosa. También significa que el XULRunner es portátil, así que si usted desarrolla sus aplicaciones para ser portátil se puede llevar a todas partes en una unidad flash o sincronizarlos en la nube.
La versión para Mac de XULRunner se distribuye como un archivo tar.bz2. Puede extraer este a cualquier lugar que quieras, pero hay muchos lugares en la documentación que se supone que tiene esta instalado en /Library/Frameworks.
En el escritorio de Ubuntu y sus derivados (Xubuntu, Kubuntu, ...), a partir de la versión 11.10 (Ocelot onírico), XULRunner no está más cuidada y no existe en el repositorio de Ubuntu. Por lo tanto, ya sea que usted necesita para compilar XULRunner manual o descargar una versión binaria del servidor FTP de Mozilla. Una forma de archieve esto es ejecutar la siguiente secuencia de comandos cada vez que se desea instalar una nueva versión:
FIREFOX_VERSION=`grep -Po  "\d{2}\.\d+" /usr/lib/firefox/platform.ini`

ARCH=`uname -p`

XURL=https://ftp.mozilla.org/pub/mozilla.org/xulrunner/releases/$FIREFOX_VERSION/runtimes/xulrunner-$FIREFOX_VERSION.en-US.linux-$ARCH.tar.bz2

cd /opt

sudo sh -c "wget -O- $XURL | tar -xj"

sudo ln -s /opt/xulrunner/xulrunner /usr/bin/xulrunner

sudo ln -s /opt/xulrunner/xpcshell /usr/bin/xpcshell
You could also save this script to a file for convenience. Note: If you are using Firefox build from Ubuntuzilla repository, replace /usr/lib/firefox/platform.ini with /opt/firefox/platform.ini.
Step 2: Install XULRunner
On Windows, unzip the archive someplace reasonable. I unzipped it to a new C:\program files\xulrunner folder.
On the Mac, extract the tar.bz2 archive, which contains XULRunner as XUL.Framework. Copy this to the /Library/Frameworks directory, or another location of your choice.
On Linux, you only need to unpack the archive if you are using a pre-release XULRunner.
Optionally, if you've downloaded the compressed archive of XULRunner and would like to install it on your system you can do so by running
xulrunner --register-global
as an administrator to register XULRunner for all users on the machine. To register XULRunner for a single user run
xulrunner --register-user
XULRunner will work whether you install it or not. This is purely for convenience.
In all systems you should unzip the omni.ja file into some example directory and take a look at all the awesome! First change the file extension to zip and then use your normal filesystem's decompression tool to open it up. The contents of omni.ja are available to XULRunner applications and are what make it possible to build amazing applications easily!
Step 3: Create the application folder structure
Time to start a simple, bare bones application shell. Call it a XUL “Hello World” if you want. All of what you see below can be found in the XULRunner documentation here on MDC in much more detail.
Hint: Skip ahead and download the sample application, you can experiment with it while following this tutorial. You can download the sample application from https://github.com/matthewkastor/XULRunner-Examples. Please continue reading to learn the "what", "why" and "how" parts of building a XULRunner application.
On Windows, I created the root in a new c:\program files\myapp folder, but you can create it wherever you like, using whatever OS you like. The same application structure is used on Windows, Mac and Linux. Here is the subfolder structure:
+ myapp/
|
+-+ chrome/
| |
| +-+ content/
| | |
| | +-- main.xul
| | |
| | +-- main.js
| |
| +-- chrome.manifest
|
+-+ defaults/
| |
| +-+ preferences/
|   |
|   +-- prefs.js
|
+-- application.ini
|
+-- chrome.manifest
Notice that there are 5 files in the folder structure: application.ini, chrome.manifest (2), prefs.js, and main.xul. The /chrome/chrome.manifest file is optional, but might be useful for backward compatibility. See the note below.
For more details on the structure of installable bundles in general see: Structure of an installable bundle.
/chrome/chrome.manifest is no longer considered the "root" manifest. XULRunner will not check that folder location for a root-level chrome.manifest. You need to move your existing chrome.manifest to the application root folder, remembering to update the relative paths within the file. You could also just create a new application root-level manifest that includes the /chrome/chrome.manifest, which is what this tutorial will do.Step 4: Set up application.ini
The application.ini file acts as the XULRunner entry point for your application. It specifies how your application intends to use the XULRunner platform as well as configure some information that XULRunner uses to run your application. Here is mine:
[App]
Vendor=XULTest
Name=myapp
Version=1.0
BuildID=20100901
[email protected]

[Gecko]
MinVersion=1.8
MaxVersion=200.*
MinVersion and MaxVersion fields indicate the range of Gecko versions your application is compatible with; make sure that you set them so that the version of XULRunner you're using is in that range, or your application won't work.Step 5: Set up the chrome manifest
The chrome manifest file is used by XULRunner to define specific URIs which in turn are used to locate application resources. This will become clearer when we see how the “chrome://” URI is used. Application chrome can be in a single or a few JAR files or uncompressed as folders and files. I am using the uncompressed method for now. Here is the chrome/chrome.manifest:
content myapp content/
As mentioned in Step 3, the default location of the chrome.manifest has changed in XULRunner 2.0, so we also need a simple chrome.manifest in the application root which will include the the manifest in our chrome root. Here is the application root chrome.manifest:
manifest chrome/chrome.manifest
Step 6: Set up preferences
The prefs.js file tells XULRunner the name of the XUL file to use as the main window. Here is mine:
pref("toolkit.defaultChromeURI", "chrome://myapp/content/main.xul");

/* debugging prefs, disable these before you deploy your application! */
pref("browser.dom.window.dump.enabled", true);
pref("javascript.options.showInConsole", true);
pref("javascript.options.strict", true);
pref("nglayout.debug.disable_xul_cache", true);
pref("nglayout.debug.disable_xul_fastload", true);
XULRunner specific preferences include:
toolkit.defaultChromeURI- Specifies the default window to open when the application is launched.
toolkit.defaultChromeFeatures- Specifies the features passed to
window.open()when the main application window is opened. toolkit.singletonWindowType- Allows configuring the application to allow only one instance at a time.
The toolkit preferences are described in further detail in XULRunner:Specifying Startup Chrome Window.
The debugging preferences are discussed in Debugging a XULRunner Application
Step 7: Create some XUL
Finally, we need to create a simple XUL window, which is described in the file main.xul. Nothing fancy here, just the minimum we need to make a window. No menus or anything.
main.xul:
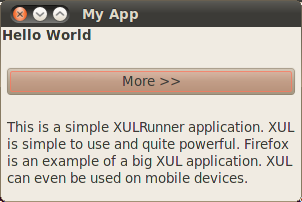
<?xml version="1.0"?>

<?xml-stylesheet href="chrome://global/skin/" type="text/css"?>

<window id="main" title="My App" width="300" height="300" xmlns="https://www.mozilla.org/keymaster/gatekeeper/there.is.only.xul">

  <script type="application/javascript" src="chrome://myapp/content/main.js"/>

  <caption label="Hello World"/>
  <separator/>
  <button label="More >>" oncommand="showMore();"/>
  <separator/>
  <description id="more-text" hidden="true">This is a simple XULRunner application. XUL is simple to use and quite powerful and can even be used on mobile devices.</description>

</window>
The application also has a JavaScript file. Most XUL applications will include some external JavaScript, so the sample application does too, just to show how to include it into the XUL file.
main.js:
function showMore() {
  document.getElementById("more-text").hidden = false;
}
For more information about XUL see: XUL.
For information about mixing HTML elements into your XUL read Adding HTML Elements.
Step 8: Run the application
The moment of truth. We need to get XULRunner to launch the bare-bones application.
Windows
From a Windows command prompt opened to the myapp folder, we should be able to execute this:
C:\path\to\xulrunner.exe application.ini
Of course, if you opted to install xulrunner then you could simply do
%ProgramFiles%\xulrunner.exe application.ini
or on 64 bit systems
%ProgramFiles(x86)%\xulrunner.exe application.ini
Note: you can also install your application when you're finished debugging it. See XUL Application Packaging for details.
Mac
On the Mac, before you can run a XULRunner application with everything intact, you must install it using the --install-app xulrunner commandline flag. Installing the application creates an OS X application bundle:
/Library/Frameworks/XUL.framework/xulrunner-bin --install-app /<path>/<to>/myapp.zip
Once installed, you can run the application:
/Library/Frameworks/XUL.framework/xulrunner-bin "/Applications/Finkle/TestApp.app/Contents/Resources/application.ini"
You may run it without installing (but with the menu bar and dock icon missing) in OS X by typing:
/Library/Frameworks/XUL.framework/xulrunner-bin "/<full path>/TestApp/application.ini"
Note: The full path is required or a "Error: couldn't parse application.ini."-message will be returned.
This might also be simplified using a very simple shell script (i call mine "run.sh"):
#!/bin/sh
/Library/Frameworks/XUL.framework/xulrunner-bin `pwd`/application.ini
Linux
On Ubuntu, you can run the application from a terminal. First change into the \myapp folder, then start the application by:
xulrunner application.ini
You should now see a window that looks something like this. This particular screenshot is from Ubuntu 10.
Alternative: Run XUL apps with Firefox
With Firefox 3 and later, you can tell the Firefox executable to run a XUL application from the command line. The XUL application will run instead of the Firefox browser that normally starts. This is similar to starting a XUL app using XULRunner. See Using Firefox to run XULRunner applications. This does not work if Firefox itself was installed as a XUL app - you need to use the installed XULRunner directly.
Further Reading:
There are many things you can do with XULRunner. Before you get too far into things you might want to read the XULRunner tips article. Also, throughout this tutorial you've been introduced to various bits of the Toolkit API and it may help you to get familiar with it. Once you've got an application that's ready for the world you'll love our article titled Deploying XULRunner.
For now, click the "next" link to learn about windows and menus in XULRunner!
Original Document Information
- Author: Mark Finkle, October 2, 2006