这一节通过使用XULRunner构建一个基本的桌面应用来探讨Mozilla平台。已知的Firefox(“火狐”Web浏览器)、Thunderbird(“雷鸟”Email客户端)和其它多种类应用程序都是使用这个平台编写完成的,可以坚信一点Mozilla平台可以被用来构建基本的应用程序。另有一个名为Creating XULRunner Apps with the Mozilla Build System的章节包含了更加完整的内容用于构建XULRunner应用程序。如果你需要修改XULRunner本身或是将XULRunner整合到外部二进制程序中,那么你需要阅读这个章节。
步骤1:下载XULRunner
你能够在MDC里的XULRunner主页中找到下载连接。由于我们并不创建任何的二进制XPCOM组件,所以仅需要下载并安装XULRunner运行时包而不是SDK。
针对WIndows版本下载得到的是一个ZIP文件而并不是真正的安装程序。作为一个开发者我更喜欢这种简单解压缩就可以完成安装的方式。我假设它不会挂接到我的Windows系统上而这是件好事。这同时也意味着XULRunner是“便携式”的,所以如果你将应用开发成一种“便携式”的形式,那么你将可以将程序放到闪存存储器中或在云端同步。
Mac版本的XULRunner被发布成tar.bz2格式的归档文件。你可以解压缩到任何你喜欢的位置,但在本文档中的多个位置都假设了你已经将解压缩得到的文件放置在了/Library/Frameworks目录中。
到从版本11.10开始在Ubuntu桌面系统及它的各种变体版本中(Xubuntu,Kubuntu),XULRunner已经不再被维护并且不存在于Ubuntu的软件仓库中了。因此不管你是想手动编译XULRunner或是从Mozilla's FTP服务器上下载发布版本。一种方法就是在每次你想安装新版本时运行以下脚本:
FIREFOX_VERSION=`grep -Po  "\d{2}\.\d+" /usr/lib/firefox/platform.ini`

  ARCH=`uname -p`

  XURL=https://ftp.mozilla.org/pub/mozilla.org/xulrunner/releases/$FIREFOX_VERSION/runtimes/xulrunner-$FIREFOX_VERSION.en-US.linux-$ARCH.tar.bz2

  cd /opt

  sudo sh -c "wget -O- $XURL | tar -xj"

  sudo ln -s /opt/xulrunner/xulrunner /usr/bin/xulrunner

sudo ln -s /opt/xulrunner/xpcshell /usr/bin/xpcshell 你也应该保存此脚本以便使用。注意:如果你使用的Firefox是构建于Ubuntuzilla仓库的,请将/usr/lib/firefox/platform.ini替换为/opt/firefox/platform.ini。
步骤2:安装XULRunner
在Windows系统中将压缩文件解压缩到一个合理的位置。我将其解压缩到了一个新创建的目录中C:\program files\xulrunner。
在Mac系统中将tar.bz2文件解压缩到名为XUL.Framework的目录中。将此目录拷贝到/Library/Frameworks,或是其它你喜欢的位置。
在Linux系统中如果你使用的是预发布(Pre-release)的XULRunner的话,你仅需要解包归档文件即可。
Optionally, if you've downloaded the compressed archive of XULRunner and would like to install it on your system you can do so by running作为可选的步骤,如果你已经下载了XULRunner的压缩文档并想将其安装到你的系统中,你可以运行以下命令来做到这一点
xulrunner --register-global
作为管理名以上命令会将XULRunner注册给本机上的所有用户。仅注册给当前用户可以运行以下命令
xulrunner --register-user
不管你是否执行了安装过程XULRunner都会正常工作。这纯粹是为了方便。
In all systems you should unzip the omni.ja file into some example directory and take a look at all the awesome! First change the file extension to zip and then use your normal filesystem's decompression tool to open it up. The contents of omni.ja are available to XULRunner applications and are what make it possible to build amazing applications easily!
步骤3:创建应用程序目录结构
是时候了,我们做一个简单的没有什么功能的应用程序。如果你愿意你可以称它为“Hello World”。所有以下你看到的你都可以在MDC的XULRunner文档中找到更细节的内容。
Hint: Skip ahead and download the sample application, you can experiment with it while following this tutorial. You can download the sample application from https://github.com/matthewkastor/XULRunner-Examples. Please continue reading to learn the "what", "why" and "how" parts of building a XULRunner application.
在Windows中我新创建了root目录在c:\program files\myapp,但你可以将其创建在任何你喜欢的地方,使用任意一种你喜欢的OS。Windows、Mac和Linux使用了相同的目录结构。这里列出了子目录的结构:
+ myapp/
|
+-+ chrome/
| |
| +-+ content/
| | |
| | +-- main.xul
| | |
| | +-- main.js
| |
| +-- chrome.manifest
|
+-+ defaults/
| |
| +-+ preferences/
|   |
|   +-- prefs.js
|
+-- application.ini
|
+-- chrome.manifest
注意在目录结构中有5个文件:application.ini、chrome.manifest (2个)、 prefs.js和main.xul。/chrome/chrome.manifest文件是可选的,但可能对向下兼容是有用的。请看以下记述内容。
关于可安装bundle的目录结构的更详细内容请参考Structure of an installable bundle。
/chrome/chrome.manifest is no longer considered the "root" manifest. XULRunner will not check that folder location for a root-level chrome.manifest. You need to move your existing chrome.manifest to the application root folder, remembering to update the relative paths within the file. You could also just create a new application root-level manifest that includes the /chrome/chrome.manifest, which is what this tutorial will do.步骤4:设置 application.ini
application.ini 文件为你的应用扮演着XULRunner入口点的角色。它指定了你的应用打算如何使用XULRunner平台以及配置一些信息以告诉XULRunner如何运行你的程序。下面是我的文件内容:
[App]
Vendor=XULTest
Name=myapp
Version=1.0
BuildID=20100901
[email protected]

[Gecko]
MinVersion=1.8
MaxVersion=200.*
MinVersion 和MaxVersion字段指示了你的应用所兼容的Gecko版本的范围;确保你设置了它们而且你所使用的XULRunner的版本也是在这个范围之内,否则你的应用将不能工作。步骤5:设置chrome清单文件
The chrome manifest file is used by XULRunner to define specific URIs which in turn are used to locate application resources. This will become clearer when we see how the “chrome://” URI is used. Application chrome can be in a single or a few JAR files or uncompressed as folders and files. I am using the uncompressed method for now. Here is the chrome/chrome.manifest:
content myapp content/
As mentioned in Step 3, the default location of the chrome.manifest has changed in XULRunner 2.0, so we also need a simple chrome.manifest in the application root which will include the the manifest in our chrome root. Here is the application root chrome.manifest:
manifest chrome/chrome.manifest
步骤6:设置配置
The prefs.js file tells XULRunner the name of the XUL file to use as the main window. Here is mine:
pref("toolkit.defaultChromeURI", "chrome://myapp/content/main.xul");

/* debugging prefs, disable these before you deploy your application! */
pref("browser.dom.window.dump.enabled", true);
pref("javascript.options.showInConsole", true);
pref("javascript.options.strict", true);
pref("nglayout.debug.disable_xul_cache", true);
pref("nglayout.debug.disable_xul_fastload", true);
XULRunner specific preferences include:
-
toolkit.defaultChromeURI - Specifies the default window to open when the application is launched.
-
toolkit.defaultChromeFeatures -
Specifies the features passed to
window.open()when the main application window is opened. -
toolkit.singletonWindowType - Allows configuring the application to allow only one instance at a time.
The toolkit preferences are described in further detail in XULRunner:Specifying Startup Chrome Window.
The debugging preferences are discussed in Debugging a XULRunner Application
步骤7:创建一些XUL
Finally, we need to create a simple XUL window, which is described in the file main.xul. Nothing fancy here, just the minimum we need to make a window. No menus or anything.
main.xul:
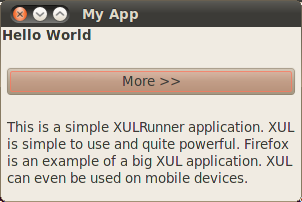
<?xml version="1.0"?>

<?xml-stylesheet href="chrome://global/skin/" type="text/css"?>

<window id="main" title="My App" width="300" height="300" xmlns="https://www.mozilla.org/keymaster/gatekeeper/there.is.only.xul">

  <script type="application/javascript" src="chrome://myapp/content/main.js"/>

  <caption label="Hello World"/>
  <separator/>
  <button label="More >>" oncommand="showMore();"/>
  <separator/>
  <description id="more-text" hidden="true">This is a simple XULRunner application. XUL is simple to use and quite powerful and can even be used on mobile devices.</description>

</window>
The application also has a JavaScript file. Most XUL applications will include some external JavaScript, so the sample application does too, just to show how to include it into the XUL file.
main.js:
function showMore() {
  document.getElementById("more-text").hidden = false;
}
For more information about XUL see: XUL.
For information about mixing HTML elements into your XUL read Adding HTML Elements.
步骤8:运行应用程序
The moment of truth. We need to get XULRunner to launch the bare-bones application.
Windows
From a Windows command prompt opened to the myapp folder, we should be able to execute this:
C:\path\to\xulrunner.exe application.ini
Of course, if you opted to install xulrunner then you could simply do
%ProgramFiles%\xulrunner.exe application.ini
or on 64 bit systems
%ProgramFiles(x86)%\xulrunner.exe application.ini
Note: you can also install your application when you're finished debugging it. See XUL Application Packaging for details.
Mac
On the Mac, before you can run a XULRunner application with everything intact, you must install it using the --install-app xulrunner commandline flag. Installing the application creates an OS X application bundle:
/Library/Frameworks/XUL.framework/xulrunner-bin --install-app /<path>/<to>/myapp.zip
Once installed, you can run the application:
/Library/Frameworks/XUL.framework/xulrunner-bin "/Applications/Finkle/TestApp.app/Contents/Resources/application.ini"
You may run it without installing (but with the menu bar and dock icon missing) in OS X by typing:
/Library/Frameworks/XUL.framework/xulrunner-bin "/<full path>/TestApp/application.ini"
Note: The full path is required or a "Error: couldn't parse application.ini."-message will be returned.
This might also be simplified using a very simple shell script (i call mine "run.sh"):
#!/bin/sh
/Library/Frameworks/XUL.framework/xulrunner-bin `pwd`/application.ini
Linux
On Ubuntu, you can run the application from a terminal. First change into the \myapp folder, then start the application by:
xulrunner application.ini
You should now see a window that looks something like this. This particular screenshot is from Ubuntu 10.
Alternative: 通过Firefox运行XUL应用
With Firefox 3 and later, you can tell the Firefox executable to run a XUL application from the command line. The XUL application will run instead of the Firefox browser that normally starts. This is similar to starting a XUL app using XULRunner. See Using Firefox to run XULRunner applications. This does not work if Firefox itself was installed as a XUL app - you need to use the installed XULRunner directly.
Further Reading:
There are many things you can do with XULRunner. Before you get too far into things you might want to read the XULRunner tips article. Also, throughout this tutorial you've been introduced to various bits of the Toolkit API and it may help you to get familiar with it. Once you've got an application that's ready for the world you'll love our article titled Deploying XULRunner.
For now, click the "next" link to learn about windows and menus in XULRunner!
Original Document Information
- Author: Mark Finkle, October 2, 2006