This translation is incomplete. Please help translate this article from English.
يستكشف هذا المقال منصة موزيلا من خلال بناء تطبيقات سطح المكتب الأساسي باستخدام XULRunner. وبالنظر إلى أن فايرفوكس، طائر الرعد، وغيرها من التطبيقات المتعددة المكتوبة باستخدام المنصة، فهي رهان آمن أنه يمكن استخدامها لبناء التطبيق الأساسي. هناك مقال مع اتباع نهج أكثر تعقيدا لبناء تطبيقات XULRunner في إنشاء تطبيقات XULRunner مع موزيلا بناء النظام. إذا كنت بحاجة إلى تغيير XULRunner نفسه أو دمجه مع ثنائيات الخارجية قد تحتاج إلى قراءة هذه المقال.
الخطوة 1: تحميل XULRunner
يمكنك العثور على رابط التحميل في الصفحة الرئيسية XULRunner هنا على MDN. ومنذ حين أننا لا نخلق أي مكون من مكونات XPCOM الثنائية، نحن بحاجة فقط لتنزيل وتثبيت حزمة وقت التشغيل XULRunner، وليس SDK.
تحميل XULRunner لـ ويندوز هو ملف مضغوط، ليس مناسباً تثبيته. كمطور، أنا أحب فكرة أن XULRunner يكون فقط ملفات غير مضغوطة على الجهاز الخاص بي. وأنا على افتراض أنها لا تحتاج إلى ربط في نظام ويندوز الخاص بي، وهذا شيء جيد. وهذا يعني أيضا أن XULRunner هو قابل للحمل كذلك، إذا كنت طورت التطبيقات الخاصة بك لتكون محمولة يمكنك أن تحملها وتحولها على محرك أقراص أو مزامنتها في السحابة.
يتم توزيع نسخة ماك من XULRunner كأرشيف tar.bz2. يمكنك استخراج هذه إلى أي مكان تريد، لكن هناك العديد من المواضيع في الوثائق التي من شأنها أن نفترض أن لديك هذا مثبت في \Library\Frameworks.
في أوبونتو سطح المكتب ومشتقاته (Xubuntu, Kubuntu, ...)، من الإصدار 11.10 (Oneiric Ocelot)، لم تعد تحتفظ بـ XULRunner وغير موجود في مستودع أوبونتو. لذلك، ربما تحتاج إلى تجميع XULRunner يدوياً أو تحميل الأفراج ثنائي من خادم FTP موزيلا. ولتحقيق ذلك، يجب تشغيل السكربيت التالي في كل مرة ترغب بتثبيت نسخة جديدة:
FIREFOX_VERSION=`grep -Po  "\d{2}\.\d+" /usr/lib/firefox/platform.ini`

ARCH=`uname -p`

XURL=https://ftp.mozilla.org/pub/mozilla.org/xulrunner/releases/$FIREFOX_VERSION/runtimes/xulrunner-$FIREFOX_VERSION.en-US.linux-$ARCH.tar.bz2

cd /opt

sudo sh -c "wget -O- $XURL | tar -xj"

sudo ln -s /opt/xulrunner/xulrunner /usr/bin/xulrunner

sudo ln -s /opt/xulrunner/xpcshell /usr/bin/xpcshell
يمكنك أيضاً حفظ السكربيت إلى ملف لتوفير العناء عليك. ملاحظة: إذا كنت تستخدم Firefox build من مستودع Ubuntuzilla، استبدال /usr/lib/firefox/platform.ini مع /opt/firefox/platform.ini.
الخطوة 2: تثبيت XULRunner
على ويندوز، فك الأرشيف في مكان معقول. I فكه إلى ملف جديد في (C:\program files\xulrunner folder).
على ماك، استخراج الأرشيف tar.bz2، الذي يحتوي على XULRunner كما XUL.Framework. نسخ هذا إلى ( /Library/Frameworks directory)، أو موقع آخر من اختيارك.
على لينكس، تحتاج فقط إلى فك الأرشيف إذا كنت تستخدم ما قبل الأفراج XULRunner.
في جميع النظم يجب عليك فك الملف omni.ja إلى الدليل على سبيل المثال وألقاء نظرة عبى محتوياته لترى كم هي مدهشة! ولفعل ذلك عليك تغير أمتداد الملف إلى (zip) و أستخدام أداة الضفط العادية لأستخراج الملفات وفتحه. محتويات omni.ja المتاحة لتطبيقات XULRunner هي التي تجعل من الممكن لبناء تطبيقات مذهلة بسهولة!
الخطوة 3: إنشاء هيكل مجلد التطبيق
حان الوقت للبدء بمثال بسيط وكشف هيكل التطبيق shell. ونسميها XUL "مرحباً بالعالم" إذا كنت تريد. وكل ما تراه أدناه يمكن العثور عليها في وثائق XULRunner هنا على MDN بمزيد من التفاصيل.
تلميح: تخطي إلى الأمام وتحميل نموذج التطبيق، يمكنك تجربة ذلك و أنت تتابع هذا البرنامج التعليمي. يمكنك تنزيل عينة التطبيق من https://github.com/matthewkastor/XULRunner-Examples. يرجى مواصلة القراءة لمعرفة "ما"، "لماذا" و "كيف" بناء أجزاء التطبيق في XULRunner.
On Windows, I created the root in a new c:\program files\myapp folder, but you can create it wherever you like, using whatever OS you like. The same application structure is used on Windows, Mac and Linux. Here is the subfolder structure:
+ myapp/
|
+-+ chrome/
| |
| +-+ content/
| | |
| | +-- main.xul
| | |
| | +-- main.js
| |
| +-- chrome.manifest
|
+-+ defaults/
| |
| +-+ preferences/
|   |
|   +-- prefs.js
|
+-- application.ini
|
+-- chrome.manifest
Notice that there are 5 files in the folder structure: application.ini, chrome.manifest (2), prefs.js, and main.xul. The /chrome/chrome.manifest file is optional, but might be useful for backward compatibility. See the note below.
For more details on the structure of installable bundles in general see: Structure of an installable bundle.
/chrome/chrome.manifest is no longer considered the "root" manifest. XULRunner will not check that folder location for a root-level chrome.manifest. You need to move your existing chrome.manifest to the application root folder, remembering to update the relative paths within the file. You could also just create a new application root-level manifest that includes the /chrome/chrome.manifest, which is what this tutorial will do.Step 4: Set up application.ini
The application.ini file acts as the XULRunner entry point for your application. It specifies how your application intends to use the XULRunner platform as well as configure some information that XULRunner uses to run your application. Here is mine:
[App]
Vendor=XULTest
Name=myapp
Version=1.0
BuildID=20100901
[email protected]

[Gecko]
MinVersion=1.8
MaxVersion=200.*
MinVersion and MaxVersion fields indicate the range of Gecko versions your application is compatible with; make sure that you set them so that the version of XULRunner you're using is in that range, or your application won't work.Step 5: Set up the chrome manifest
The chrome manifest file is used by XULRunner to define specific URIs which in turn are used to locate application resources. This will become clearer when we see how the “chrome://” URI is used. Application chrome can be in a single or a few JAR files or uncompressed as folders and files. I am using the uncompressed method for now. Here is the chrome/chrome.manifest:
content myapp content/
As mentioned in Step 3, the default location of the chrome.manifest has changed in XULRunner 2.0, so we also need a simple chrome.manifest in the application root which will include the the manifest in our chrome root. Here is the application root chrome.manifest:
manifest chrome/chrome.manifest
Step 6: Set up preferences
The prefs.js file tells XULRunner the name of the XUL file to use as the main window. Here is mine:
pref("toolkit.defaultChromeURI", "chrome://myapp/content/main.xul");

/* debugging prefs, disable these before you deploy your application! */
pref("browser.dom.window.dump.enabled", true);
pref("javascript.options.showInConsole", true);
pref("javascript.options.strict", true);
pref("nglayout.debug.disable_xul_cache", true);
pref("nglayout.debug.disable_xul_fastload", true);
XULRunner specific preferences include:
toolkit.defaultChromeURI- Specifies the default window to open when the application is launched.
toolkit.defaultChromeFeatures- Specifies the features passed to
window.open()when the main application window is opened. toolkit.singletonWindowType- Allows configuring the application to allow only one instance at a time.
The toolkit preferences are described in further detail in XULRunner:Specifying Startup Chrome Window.
The debugging preferences are discussed in Debugging a XULRunner Application
Step 7: Create some XUL
Finally, we need to create a simple XUL window, which is described in the file main.xul. Nothing fancy here, just the minimum we need to make a window. No menus or anything.
main.xul:
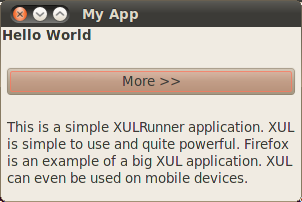
<?xml version="1.0"?>

<?xml-stylesheet href="chrome://global/skin/" type="text/css"?>

<window id="main" title="My App" width="300" height="300" xmlns="https://www.mozilla.org/keymaster/gatekeeper/there.is.only.xul">

  <script type="application/javascript" src="chrome://myapp/content/main.js"/>

  <caption label="Hello World"/>
  <separator/>
  <button label="More >>" oncommand="showMore();"/>
  <separator/>
  <description id="more-text" hidden="true">This is a simple XULRunner application. XUL is simple to use and quite powerful and can even be used on mobile devices.</description>

</window>
The application also has a JavaScript file. Most XUL applications will include some external JavaScript, so the sample application does too, just to show how to include it into the XUL file.
main.js:
function showMore() {
  document.getElementById("more-text").hidden = false;
}
For more information about XUL see: XUL.
For information about mixing HTML elements into your XUL read Adding HTML Elements.
Step 8: Run the application
The moment of truth. We need to get XULRunner to launch the bare-bones application.
Windows
From a Windows command prompt opened to the myapp folder, we should be able to execute this:
C:\path\to\xulrunner.exe application.ini
Of course, if you opted to install xulrunner then you could simply do
%ProgramFiles%\xulrunner.exe application.ini
or on 64 bit systems
%ProgramFiles(x86)%\xulrunner.exe application.ini
Note: you can also install your application when you're finished debugging it. See XUL Application Packaging for details.
Mac
On the Mac, before you can run a XULRunner application with everything intact, you must install it using the --install-app xulrunner commandline flag. Installing the application creates an OS X application bundle:
/Library/Frameworks/XUL.framework/xulrunner-bin --install-app /<path>/<to>/myapp.zip
Once installed, you can run the application:
/Library/Frameworks/XUL.framework/xulrunner-bin "/Applications/Finkle/TestApp.app/Contents/Resources/application.ini"
You may run it without installing (but with the menu bar and dock icon missing) in OS X by typing:
/Library/Frameworks/XUL.framework/xulrunner-bin "/<full path>/TestApp/application.ini"
Note: The full path is required or a "Error: couldn't parse application.ini."-message will be returned.
This might also be simplified using a very simple shell script (i call mine "run.sh"):
#!/bin/sh
/Library/Frameworks/XUL.framework/xulrunner-bin `pwd`/application.ini
Linux
On Ubuntu, you can run the application from a terminal. First change into the \myapp folder, then start the application by:
xulrunner application.ini
You should now see a window that looks something like this. This particular screenshot is from Ubuntu 10.
Alternative: Run XUL apps with Firefox
With Firefox 3 and later, you can tell the Firefox executable to run a XUL application from the command line. The XUL application will run instead of the Firefox browser that normally starts. This is similar to starting a XUL app using XULRunner. See Using Firefox to run XULRunner applications. This does not work if Firefox itself was installed as a XUL app - you need to use the installed XULRunner directly.
Further Reading:
There are many things you can do with XULRunner. Before you get too far into things you might want to read the XULRunner tips article. Also, throughout this tutorial you've been introduced to various bits of the Toolkit API and it may help you to get familiar with it. Once you've got an application that's ready for the world you'll love our article titled Deploying XULRunner.
For now, click the "next" link to learn about windows and menus in XULRunner!
Original Document Information
- Author: Mark Finkle, October 2, 2006