« CSS « CSS z-index 이해하기
쌓임 맥락(stacking context) 이야기
이전 예제에서(z-index 적용) 특정 DIV의 렌더링 순서는 z-index 속성 값에 영향을 받는다는것을 알았다. 이 현상은 DIV들이 가진 특별한 속성 때문에 그렇다. 바로 쌓임 맥락(stacking context)을 형성한다는 것이다.
쌓임 맥락은 다음 엘리먼트들에 의해 만들어진다.
- html 뿌리 엘리먼트
- position 속성이 지정되고(absolute든 relative든 상관없이) z-index 속성이 auto 이외의 값을 가지는 엘리먼트들
- z-index값이 auto가 아닌 다른 값을 가진 flex 요소
- 투명도가 1보다 적게 지정된 엘리먼트들(
opacity) (투명도 명세를 보라) - 모바일 웹킷과 크롬 22이상에서는 z-index가 auto여도
position: fixed이면 항상 새로운 쌓임 맥락이 만들어진다.(이 내용을 보라)
쌓임 맥락 안에서는 자식 엘리먼트들이 이전 예제에서 설명된 규칙들에 의해 쌓인다. 자식 엘리먼트들의 z-index 속성 값은 오로지 부모안에서만 의미를 가진다. 쌓임 맥락은 부모 엘리먼트의 쌓임 맥락을 구성하는 하나의 단위이다.
요약하자면
- position 속성 값을 지정하고 z-index 속성 값을 지정한 엘리먼트는 쌓임 맥락을 만든다(1이 아닌 투명도를 지정하거나)
- 쌓임 맥락은 다른 쌓임 맥락 안에 포함될 수 있다. 따라서 쌓임 맥락들이 모여서 계층 구조를 이룬다.
- 부모 쌓임 맥락들은 자손 쌓임 맥락과는 완전히 독립되어있다. 오로지 자손 쌓임 맥락만이 부모 쌓임 맥락의 영향을 받는다.
- 일단 자식 쌓임 맥락들이 그들의 순서대로 쌓이고 나면 전체는 부모의 쌓임 순서를 따른다.
Note: 쌓임 맥락의 계층구조는 HTML 엘리먼트들의 계층구조의 부분집합이다. 왜냐하면 특정 엘리먼트만이 쌓이 맥락을 만들기 때문이다. 따라서 자신만의 쌓임 맥락을 만들지 않는 엘리먼트들에 대해 '부모 쌓임 맥락에 의해 동화된다.'라 할수 있겠다.
예제
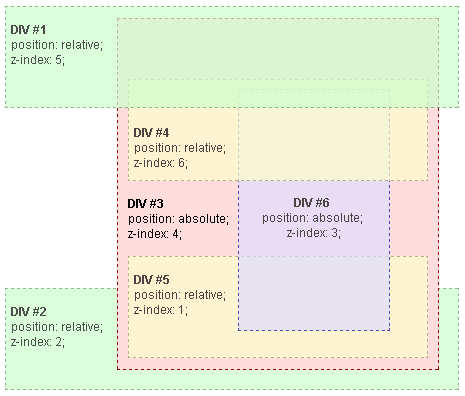
이 예제에서는 모든 엘리먼트들이 쌓임 맥락을 형성한다. 왜냐하면 모든 엘리먼트가 position 속성 값과 z-index 속성 값을 지니기 때문이다. 쌓임 맥락들의 계층구조는 다음과 같다.
- 뿌리 엘리먼트
- DIV #1
- DIV #2
- DIV #3
- DIV #4
- DIV #5
- DIV #6
DIV #4, DIV #5, DIV #6은 DIV #3의 자식이므로 오로지 DIV #3 내부에서만 쌓임 경쟁이 일어났다는 것을 이해하는게 중요하다. DIV #3 내부의 엘리먼트들이 그들만의 쌓임 순서대로 모두 렌더링 되었다면 전체 DIV #3은 뿌리 엘리먼트 이하에서 쌓인다.
노트:
- DIV #4는 DIV #1보다 z-index 속성 값이 더 크지만 DIV #1보다 아래에 렌더링 되었다. 왜냐하면 DIV #1의 z-index 속성 값인 5는 뿌리 엘리먼트의 쌓임 맥락 안에서 유효하나 DIV #4의 z-index 속성 값인 6은 DIV #3의 쌓임 맥락 안에서만 유효하기 때문이다. DIV #4는 자신이 속하는 DIV #3의 z-index 속성 값이 3이므로 DIV #1 아래에 쌓였다.
- 같은 이유로 DIV #2는 DIV #5 아래에 렌더링 되었다. DIV #5는 DIV #2보다 z-index 값이 작지만 뿌리 엘리먼트의 쌓임 맥락안에서 유효한 DIV #5가 속한 DIV #3의 z-index 값이 DIV #2의 z-index 값 보다 더 크기 때문이다.
- DIV #3의 z-index 속성 값인 4는 DIV #4, DIV #5, DIV #6의 z-index 속성값과 독립적이다. 왜냐하면 다른 쌓임 맥락에 속해있기 때문이다.
- 렌더링 순서를 이해하는 쉬운 방법은 z-index를 "버전 번호" 처럼 생각하는 것이다. 자식 엘리먼트는 부모 엘리먼트 버전 번호의 마이너 버전이다. 이 방법은 왜 z-index가 1인 DIV #5가 z-index가 2인 DIV #2 위에 쌓였는지, z-index가 6인 DIV #4가 z-index가 5인 DIV #1 아래에 쌓였는지 이해하게 해준다. 우리 예제에서는
- 뿌리 엘리먼트
- DIV #2 - z-index가 2
- DIV #3 - z-index가 4
- DIV #5 - z-index가 1인데 z-index가 4인 엘리먼트 아래에서 쌓였으므로 렌더링 순서는 4.1이다.
- DIV #6 - z-index가 3인데 z-index가 4인 엘리먼트 아래에서 쌓였으므로 렌더링 순서는 4.3이다.
- DIV #4 - z-index가 6인데 z-index가 4인 엘리먼트 아래에서 쌓였으므로 렌더링 순서는 4.6이다.
- DIV #1 - z-index가 5
- 뿌리 엘리먼트
예제 소스 코드
<?xml version="1.0" encoding="utf-8"?>
<!DOCTYPE html PUBLIC "-//W3C//DTD XHTML 1.0 Strict//EN"
  "https://www.w3.org/TR/xhtml1/DTD/xhtml1-strict.dtd">

<html xmlns="https://www.w3.org/1999/xhtml" xml:lang="en">
  <head>

    <title>Understanding CSS z-index: The Stacking Context: Example Source</title>

    <style type="text/css">
      * {
        margin: 0;
        }
      html {
        padding: 20px;
        font: 12px/20px Arial, sans-serif;
        }
      div {
        opacity: 0.7;
        position: relative;
        }
      h1 {
        font: inherit;
        font-weight: bold;
        }
      #div1, #div2 {
        border: 1px dashed #696;
        padding: 10px;
        background-color: #cfc;
        }
      #div1 {
        z-index: 5;
        margin-bottom: 190px;
        }
      #div2 {
        z-index: 2;
        }
      #div3 {
        z-index: 4;
        opacity: 1;
        position: absolute;
        top: 40px;
        left: 180px;
        width: 330px;
        border: 1px dashed #900;
        background-color: #fdd;
        padding: 40px 20px 20px;
        }
      #div4, #div5 {
        border: 1px dashed #996;
        background-color: #ffc;
        }
      #div4 {
        z-index: 6;
        margin-bottom: 15px;
        padding: 25px 10px 5px;
        }
      #div5 {
        z-index: 1;
        margin-top: 15px;
        padding: 5px 10px;
        }
      #div6 {
        z-index: 3;
        position: absolute;
        top: 20px;
        left: 180px;
        width: 150px;
        height: 125px;
        border: 1px dashed #009;
        padding-top: 125px;
        background-color: #ddf;
        text-align: center;
        }
    </style>

  </head>
  <body>

    <div id="div1">
      <h1>Division Element #1</h1>
      <code>position: relative;<br/>
      z-index: 5;</code>
    </div>

    <div id="div2">
      <h1>Division Element #2</h1>
      <code>position: relative;<br/>
      z-index: 2;</code>
    </div>

    <div id="div3">

      <div id="div4">
        <h1>Division Element #4</h1>
        <code>position: relative;<br/>
        z-index: 6;</code>
      </div>

      <h1>Division Element #3</h1>
      <code>position: absolute;<br/>
      z-index: 4;</code>

      <div id="div5">
        <h1>Division Element #5</h1>
        <code>position: relative;<br/>
        z-index: 1;</code>
      </div>

      <div id="div6">
        <h1>Division Element #6</h1>
        <code>position: absolute;<br/>
        z-index: 3;</code>
      </div>

    </div>

  </body>
</html>
Division Element #1
     position: relative;
      z-index: 5;
Division Element #2
     position: relative;
      z-index: 2;
Division Element #4
       position: relative;
        z-index: 6;
Division Element #3
     position: absolute;
      z-index: 4;
Division Element #5
       position: relative;
        z-index: 1;
Division Element #6
       position: absolute;
        z-index: 3;
See also
- Stacking without z-index : Default stacking rules
- Stacking and float : How floating elements are handled
- Adding z-index : Using z-index to change default stacking
- Stacking context example 1 : 2-level HTML hierarchy, z-index on the last level
- Stacking context example 2 : 2-level HTML hierarchy, z-index on all levels
- Stacking context example 3 : 3-level HTML hierarchy, z-index on the second level
Original Document Information
- Author(s): Paolo Lombardi
- This article is the english translation of an article I wrote in italian for YappY. I grant the right to share all the content under Creative Commons: Attribution-Sharealike license
- Last Updated Date: July 9th, 2005