Element.getClientRects() 方法返回一个指向客户端中每一个盒子的边界矩形的矩形集合。
语法
var rectCollection = object.getClientRects();返回
返回值是ClientRect对象集合,该对象是与该元素相关的CSS边框。每个ClientRect对象包含一组描述该边框的只读属性——left、top、right和bottom,单位为像素,这些属性值是相对于视口的top-left的。即使当表格的标题在表格的边框外面,该标题仍会被计算在内。
起初,微软打算让这个方法给文本的每一行都返回一个TextRectangle,但是,CSSOM工作草案规定它应该给每个边框返回一个ClientRect。因此,对于行内元素这两个定义是相同的,但是对于块级元素,Mozilla只会返回一个矩形。(译者注:对于行内元素,元素内部的每一行都会有一个边框;对于块级元素,如果里面没有其他元素,一整块元素只有一个边框)。
FireFox 3.5给TextRectangle对象添加了width和height属性
当计算边界矩形时,会考虑视口区域(或其他可滚动元素)内的滚动操作.
返回的矩形不包括任何可能超出元素范围的子元素的边界。
对于HTML AREA元素、自身不做任何渲染的SVG元素、display:none元素和不直接渲染出来的任何元素,都将会返回一个空列表。
具有空边框的CSS盒子也会返回矩形,此时left、top、right和bottom坐标仍旧有意义。
小数级别的像素偏移是有可能的。
举例
以下举例是从附件中获取的快照。
一个 内部由span构成的段落(译者注:即<p><span>Paragraph that spans mutiple lines</span></p>),span和段落都有边框集合。客户矩形是红色的。注意,段落p只有一个边框(p's rect),然而span有多个边框(span's rects)。

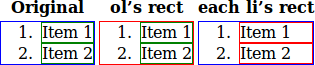
一个列表。注意边框不包括哪些数字,也因此不包括客户矩形。
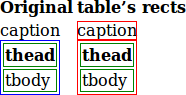
一个带有标题的表单。尽管表单的边框不包括标题,但是客户矩形是包含标题的。
function addClientRectsOverlay(elt) {
	// 通过给每个客户矩形上方遮盖一个绝对定位的div,来保证边界宽度与矩形宽度一致。
	// 注意:如果用户改变大小或者缩放,绘图将会重绘。
	var rects = elt.getClientRects();
	for (var i = 0; i != rects.length; i++) {
		var rect = rects[i];
		var tableRectDiv = document.createElement('div');
		tableRectDiv.style.position = 'absolute';
		tableRectDiv.style.border = '1px solid red';
		var scrollTop = document.documentElement.scrollTop || document.body.scrollTop;
		var scrollLeft = document.documentElement.scrollLeft || document.body.scrollLeft;
		tableRectDiv.style.margin = tableRectDiv.style.padding = '0';
		tableRectDiv.style.top = (rect.top + scrollTop) + 'px';
		tableRectDiv.style.left = (rect.left + scrollLeft) + 'px';
		// 我们希望 rect.width 作为边框宽度,所以内容宽度减少2px
		tableRectDiv.style.width = (rect.width - 2) + 'px';
		tableRectDiv.style.height = (rect.height - 2) + 'px';
		document.body.appendChild(tableRectDiv);
	}
}
实例
.注意:javascript函数绘制了与css样式“withClientRectsoverlay”相关联的客户矩形。
HTML
.举例1:HTML创建了三段带有span的p段落并放入div块中。在第二个段落p上绘制了客户矩形。在第三个段落p的span元素上绘制了客户矩形。
<h3>A paragraph with a span inside</h3>
<p>Both the span and the paragraph have a border set. The client rects are in red. Note that the p has only one border box, while the span has multiple border boxes.</p>

<div>
 <strong>Original</strong>
 <p>
  <span>Paragraph that spans multiple lines</span>
 </p>
</div>

<div>
 <strong>p's rect</strong>
 <p class="withClientRectsOverlay">
  <span>Paragraph that spans multiple lines</span>
 </p>
</div>

<div>
 <strong>span's rect</strong>
 <p>
  <span class="withClientRectsOverlay">Paragraph that spans multiple lines</span>
 </p>
</div>
Example 2: 举例2:HTML 创建了3个有序列表。在第二个列表的 ol 上绘制了客户矩形,在第三个列表的 li 上绘制了客户矩形。
<h3>A list</h3>
<p>Note that the border box doesn't include the number, so neither do the client rects.</p>

<div>
 <strong>Original</strong>
 <ol>
  <li>Item 1</li>
  <li>Item 2</li>
 </ol>
</diV>

<div>
 <strong>ol's rect</strong>
 <ol class="withClientRectsOverlay">
  <li>Item 1</li>
  <li>Item 2</li>
 </ol>
</div>

<div>
 <strong>each li's rect</strong>
 <ol>
  <li class="withClientRectsOverlay">Item 1</li>
  <li class="withClientRectsOverlay">Item 2</li>
 </ol>
</div>
举例3:HTML 创建了两个带有标题的表。第二个表上绘制了客户矩形。
<h3>A table with a caption</h3>
<p>Although the table's border box doesn't include the caption, the client rects do include the caption.</p>

<div>
 <strong>Original</strong>
 <table>
  <caption>caption</caption>
  <thead>
    <tr><th>thead</th></tr>
  </thead>
  <tbody>
    <tr><td>tbody</td></tr>
  </tbody>
 </table>
</div>

<div>
 <strong>table's rect</strong>
 <table class="withClientRectsOverlay">
  <caption>caption</caption>
  <thead>
    <tr><th>thead</th></tr>
  </thead>
  <tbody>
    <tr><td>tbody</td></tr>
  </tbody>
 </table>
</div>
CSS
使用 CSS 给第一举例的每个 div 内部的段落和 span、第二个举例的 ol 和 li 周围、第三个举例 的 table/th/td 元素周围绘制了边框。
strong {
  text-align: center;
}
div {
  display: inline-block;
  width: 150px;
}
div p, ol, table {
  border: 1px solid blue;
}
span, li, th, td {
  border: 1px solid green;
}
JavaScript
JavaScript 代码为所有带有“widthClientRectsOverlay”样式的元素绘制了ClientRects。
function addClientRectsOverlay(elt) {
    // 为了使边框宽度与矩形宽度一致,这里给每个客户矩形上方绝对定位一个 div。
    // 注意:如果用户改变大小或者缩放,绘图将会重绘。

    var rects = elt.getClientRects();
    for (var i = 0; i != rects.length; i++) {
        var rect = rects[i];
        var tableRectDiv = document.createElement('div');
        tableRectDiv.style.position = 'absolute';
        tableRectDiv.style.border = '1px solid red';
        var scrollTop = document.documentElement.scrollTop || document.body.scrollTop;
        var scrollLeft = document.documentElement.scrollLeft || document.body.scrollLeft;
        tableRectDiv.style.margin = tableRectDiv.style.padding = '0';
        tableRectDiv.style.top = (rect.top + scrollTop) + 'px';
        tableRectDiv.style.left = (rect.left + scrollLeft) + 'px';
        // 我们希望 rect.width 作为边框宽度,所以内容宽度减少2px

        tableRectDiv.style.width = (rect.width - 2) + 'px';
        tableRectDiv.style.height = (rect.height - 2) + 'px';
        document.body.appendChild(tableRectDiv);
    }
}

(function() {
  /* 给所有具有"widthClientRectsOverlay"样式的元素调用函数addClientRectsOverlay(elt) */
  var elt = document.getElementsByClassName('withClientRectsOverlay');
  for (var i = 0; i < elt.length; i++) {
    addClientRectsOverlay(elt[i]);
  }
})();
结果
规范
CSSOM Views: The getClientRects() and getBoundingClientRect() methods
注意
getClientRects() 在 MS IE DHTML 对象模型中首次引入。