Introdução
Este artigo oferece uma visão geral de alguns métodos fundamentais DOM e como utilizá-los via JavaScript. Você irá aprender como criar, manipular e remover elementos HTML dinamicamente. Os métodos DOM apresentados aqui não são específicos do HTML — eles também se aplicam ao XML. As demonstrações devem funcionar corretamente em navegadores modernos.
Visão geral do Sample1.html
As seções deste artigo vão apresentar DOM por meio de exemplos. Para iniciar, comece verificando o exemplo abaixo. Este utiliza de métodos DOM level 1, por meio de JavaScript, e irá criar uma tabela HTML dinamicamente. A tabela criada deve ter 4 células e um conteúdo de texto dentro delas.
<html>
<head>
<title>Sample code - Traversing an HTML Table with JavaScript and DOM Interfaces</title>
<script>
    function start() {
        // get the reference for the body
        var body = document.getElementsByTagName("body")[0];

        // creates a <table> element and a <tbody> element
        var tbl     = document.createElement("table");
        var tblBody = document.createElement("tbody");

        // creating all cells
        for (var j = 0; j < 2; j++) {
            // creates a table row
            var row = document.createElement("tr");

            for (var i = 0; i < 2; i++) {
                // Create a <td> element and a text node, make the text
                // node the contents of the <td>, and put the <td> at
                // the end of the table row
                var cell = document.createElement("td");
                var cellText = document.createTextNode("cell is row "+j+", column "+i);
                cell.appendChild(cellText);
                row.appendChild(cell);
            }

            // add the row to the end of the table body
            tblBody.appendChild(row);
        }

        // put the <tbody> in the <table>
        tbl.appendChild(tblBody);
        // appends <table> into <body>
        body.appendChild(tbl);
        // sets the border attribute of tbl to 2;
        tbl.setAttribute("border", "2");
    }
</script>
</head>
<body onload="start()">
</body>
</html>
Observe a ordem de criação dos elementos:
- Primeiro o elemento <table> é criado.
- Depois o elemento <tbody>.
- Depois um loop foi criado para fazer as linhas por meio de elementos <tr>. Eles foram inseridos dentro do elemento <tbody>.
- Para cada elemento <tr>, um outro loop foi criado para os elementos <td> que são as células da tabela.
- Para cada elemento <td> um nó de texto foi criado — este é de fato a célula visível com o texto.
Na media que os elementos são criados, eles são inseridos dentro de outros elementos criando-se uma estrutura com hierarquia. A inserção é feita a partir das "folhas" depois subindo na hierarquia, até o final onde a tabela será inserida no HTML. Assim quando a tabela for inserida ela deverá aparecer completa.
- Primeiro o nó de texto é inserido no elemento <td> por meio de
cell.appendChild(cellText);
- Depois nós colocamos o <td> chamados no código de "cell" dentro dos <tr>
row.appendChild(cell);
- Depois os <tr> são colocados dentro do <tbody> também com o uso da interface appendChild
tblBody.appendChild(row);
- o <tbody> na table
tbl.appendChild(tblBody);
- E finalmente a tabela é colocada dentro do corpo do HTML no elemento <body>
body.appendChild(tbl);
Esta técnica é uma das mais básicas para a inserção de elementos no HTML e as interfaces também podem ser utilizadas para inserção de elementos em outros tipos de documentos baseados em XML que tem suporte para W3C DOM Level 1.
Abaixo é o código gerado pelo exemplo acima:
...
<table border="2">
<tr><td>cell is row 0 column 0</td><td>cell is row 0 column 1</td></tr>
<tr><td>cell is row 1 column 0</td><td>cell is row 1 column 1</td></tr>
</table>
...
E abaixo a representação em árvore:
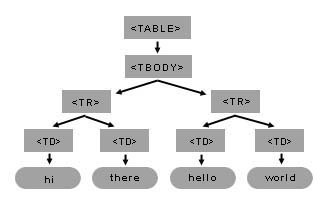
O exemplo permite criar uma tabela com dois métodos DOM. No entanto, é importante ter em mente sempre o modelo de árvore. You can build this table and its internal child elements by using just a few DOM methods. Na forma narrativa a estrutura acima inicia com uma tabela (<table>) que tem somente um nó filho, o <tbody> que por sua vez possui dois nós filhos, <tr>, e cada <tr> tem dois <td> que por sua vez possuem um elemento do tipo nó de texto.
Métodos fundamentais DOM - Sample2.html
getElementsByTagName() é um método que é disponível na interface Document e também na interface Element. Assim, utilize-o para obter a lista de todos elementos descendentes do elemento interface que você utilizou — seja o document ou um elemento DOM.
getElementsByTagName returns a list of descendant elements that have the specified tagname. From that list of elements, you can reach an individual element by calling the item method, passing an index for the item number you want returned. The first child element of the list is element number zero. It's easy and very simple but needs attention when you are working with large structures. In the next topic we continue working with the Table sample. The following sample is a simpler one, intended to show some basic methods:
<html>
<head>
<title>Sample code - Traversing an HTML Table with JavaScript and DOM
Interfaces</title>
<script>
    function start() {
        // get a list of all the body elements (there will only be one),
        // and then select the zeroth (or first) such element
        myBody = document.getElementsByTagName("body")[0];

        // now, get all the p elements that are descendants of the body
        myBodyElements = myBody.getElementsByTagName("p");

        // get the second item of the list of p elements
        myP = myBodyElements[1];
    }
</script>
</head>
<body onload="start()">
<p>hi</p>
<p>hello</p>
</body>
</html>
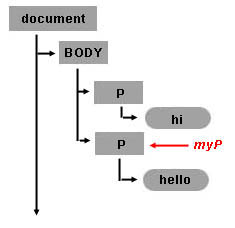
In this example, we set the myP variable to the DOM object for the second p element inside the body:
- First, we get a list of all the body elements via
myBody = document.getElementsByTagName("body")[0]Since there is only one body element in any valid HTML document, this list will have only one item, which we retrieve by selecting the first element in that list using[0]. - Next, we get all the p elements that are descendants of the body via
myBodyElements = myBody.getElementsByTagName("p"); - Finally, we get the second item from the list of p elements via
myP = myBodyElements[1];
Once you have gotten the DOM object for an HTML element, you can set its properties. For example, if you want to set the style background color property, you just add:
myP.style.background = "rgb(255,0,0)";
// setting inline STYLE attribute
Creating TextNodes with document.createTextNode("..")
Use the document object to invoke the createTextNode method and create your text node. You just need to pass the text content. The return value is an object that represents the text node.
myTextNode = document.createTextNode("world");
This means that you have created a node of the type TEXT_NODE (a piece of text) whose text data is "world", and myTextNode is your reference to this node object. To insert this text into your HTML page, you need to make this text node a child of some other node element.
Inserting Elements with appendChild(..)
So, by calling myP.appendChild([node_element]), you are making the element a new child of the second <p> element.
myP.appendChild(myTextNode);
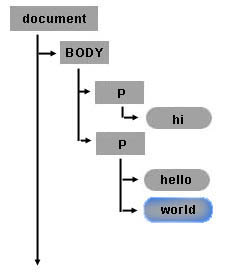
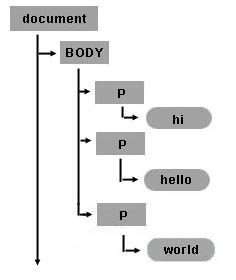
After testing this sample, note that the words hello and world are together: helloworld. So visually, when you see the HTML page it seems like the two text nodes hello and world are a single node, but remember that in the document model, there are two nodes. The second node is a new node of type TEXT_NODE, and it is the second child of the second <p> tag. The following figure shows the recently created Text Node object inside the document tree.
Creating New Elements with the document object and the createElement(..) method
You can create new HTML elements or any other element you want with createElement. For example, if you want to create a new <p> element as a child of the <body> element, you can use the myBody in the previous example and append a new element node. To create a node simply call document.createElement("tagname"). For example:
myNewPTAGnode = document.createElement("p");
myBody.appendChild(myNewPTAGnode);
Removing nodes with the removeChild(..) method
Each node can be removed. The following line removes the text node which contains the word world of the myP (second <p> element).
myP.removeChild(myTextNode);
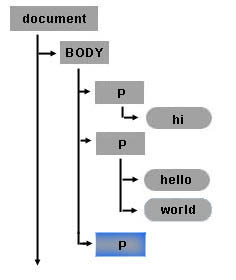
Finally you can add myTextNode (which contains the word world) into the recently created <p> element:
myNewPTAGnode.appendChild(myTextNode);
The final state for the modified object tree looks like this:
Creating a table dynamically (back to Sample1.html)
For the rest of this article we will continue working with sample1.html. The following figure shows the table object tree structure for the table created in the sample.
Reviewing the HTML Table structure
Creating element nodes and inserting them into the document tree
The basic steps to create the table in sample1.html are:
- Get the body object (first item of the document object).
- Create all the elements.
- Finally, append each child according to the table structure (as in the above figure). The following source code is a commented version for the sample1.html.
setAttribute. setAttribute has two arguments: the attribute name and the attribute value. You can set any attribute of any element using the setAttribute method.<head>
<title>Sample code - Traversing an HTML Table with JavaScript and DOM Interfaces</title>
<script>
function start() {
// get the reference for the body
var mybody = document.getElementsByTagName("body")[0];
// creates <table> and <tbody> elements
mytable = document.createElement("table");
mytablebody = document.createElement("tbody");
// creating all cells
for(var j = 0; j < 2; j++) {
// creates a <tr> element
mycurrent_row = document.createElement("tr");
for(var i = 0; i < 2; i++) {
// creates a <td> element
mycurrent_cell = document.createElement("td");
// creates a Text Node
currenttext = document.createTextNode("cell is row " + j + ", column " + i);
// appends the Text Node we created into the cell <td>
mycurrent_cell.appendChild(currenttext);
// appends the cell <td> into the row <tr>
mycurrent_row.appendChild(mycurrent_cell);
}
// appends the row <tr> into <tbody>
mytablebody.appendChild(mycurrent_row);
}
// appends <tbody> into <table>
mytable.appendChild(mytablebody);
// appends <table> into <body>
mybody.appendChild(mytable);
// sets the border attribute of mytable to 2;
mytable.setAttribute("border","2");
}
</script>
</head>
<body onload="start()">
</body>
</html>
Manipulating the table with DOM and CSS
Getting a text node from the table
This example introduces two new DOM attributes. First it uses the childNodes attribute to get the list of child nodes of mycel. The childNodes list includes all child nodes, regardless of what their name or type is. Like getElementsByTagName(), it returns a list of nodes. The differences are that (a) getElementsByTagName() only returns elements of the specified tag name; and (b) getElementsByTagName() returns descendants at any level, not just immediate children. Once you have the returned list, use [x] method to retrieve the desired child item. This example stores in myceltext the text node of the second cell in the second row of the table. Then, to display the results in this example, it creates a new text node whose content is the data of myceltext and appends it as a child of the <body> element.
mybody      = document.getElementsByTagName("body")[0];
mytable     = mybody.getElementsByTagName("table")[0];
mytablebody = mytable.getElementsByTagName("tbody")[0];
myrow       = mytablebody.getElementsByTagName("tr")[1];
mycel       = myrow.getElementsByTagName("td")[1];

// first item element of the childNodes list of mycel
myceltext=mycel.childNodes[0];

// content of currenttext is the data content of myceltext
currenttext=document.createTextNode(myceltext.data);
mybody.appendChild(currenttext);
Getting an attribute value
At the end of sample1 there is a call to setAttribute on the mytable object. This call was used to set the border property of the table. To retrieve the value of the attribute, use the getAttribute method:
mytable.getAttribute("border");
Hiding a column by changing style properties
Once you have the object in your JavaScript variable, you can set style properties directly. The following code is a modified version of sample1.html in which each cell of the second column is hidden and each cell of the first column is changed to have a red background. Note that the style property was set directly.
<html>
<body onload="start()">
</body>
<script>
    function start() {
       var mybody =document.getElementsByTagName("body")[0];
       mytable     = document.createElement("table");
       mytablebody = document.createElement("tbody");

       for(var j = 0; j < 2; j++) {
           mycurrent_row=document.createElement("tr");
           for(var i = 0; i < 2; i++) {
               mycurrent_cell = document.createElement("td");
               currenttext = document.createTextNode("cell is:" + i + j);
               mycurrent_cell.appendChild(currenttext);
               mycurrent_row.appendChild(mycurrent_cell);
               // set the cell background color
               // if the column is 0. If the column is 1 hide the cel
               if (i == 0) {
                   mycurrent_cell.style.background = "rgb(255,0,0)";
               } else {
                   mycurrent_cell.style.display = "none";
               }
           }
           mytablebody.appendChild(mycurrent_row);
       }
       mytable.appendChild(mytablebody);
       mybody.appendChild(mytable);
    }
</script>
</html>
Interwiki