Esta tradução está incompleta. Ajude atraduzir este artigo.
Verbatim is a web-based tool (specifically a Mozilla-hosted Pootle instance) for localizing Mozilla web content. It can be used to localize a variety of Mozilla projects and is capable of supporting any language. This guide will walk you through localizing a common Mozilla web project. The tutorial here will give you a solid foundation for using Verbatim to localize any Mozilla web project you hope to add to your localization community's efforts. We'll discuss what specific projects Verbatim is currently being used for, how to get started with Verbatim, and the tasks that are commonly accomplished through using Verbatim.
Getting started with Verbatim
Being that it is web-based, localizers must be online to use Verbatim. There are essentially two ways to get started with Verbatim: start a new localization or join an existing localization community's efforts. Either way, you will need to follow these steps to start working on a Verbatim project.
| Start a new localization on Verbatim | Join an existing localization on Verbatim |
|---|---|
|
|
|
|
Example: I would like to request that you add the en-US as a new localization in Verbatim. The langauge is English. Also, I like cookies. Lots and lots of cookies. I can easily be motivated by any and all baked goods.
|
Example: I would like to join your localization efforts on Verbatim for this locale. Where would be the best place for me to begin? Also, I would like to buy you a drink to encourage you to let me join the team!
|
Now that you're registered and logged in, we'll outline the general translation workflow, using the MDN project page as our example.
Translating
First thing's first, you need to find untranslated source strings to translate.
- Navigate to the MDN project page.
- Select your language from the Overview tab.
- Now click on the the Translate tab. This tab will display the directories for the MDN user interface.
- Select the LC Messages directory. This is where the project's
.pofiles containing translatable strings are located. You will now see an overview of each.pofile. - In the summary column, the number of words untranslated will be shown as a link. Click on that link to be taken directly to the first string that needs to be translated.
Now you're ready to contribute translations and you won't believe how easy it is. Check it out, you can contribute translations in two simple steps:
- Simply type your translation in the box to below the English string
- Select Suggest. If you have approval permission, select Submit. You will then be taken to the next string that needs translating.
- Hooray! You're translating! Repeat steps one and two for the remainder of the untranslated strings.
Some extra cool features on Verbatim
Here are a few additional items about the Verbatim interface that you should be aware of. Some of these can be seen in the screen shot below.
- You can copy the English string over to the translation box by clicking the Copy icon.
- You can use machine translation by clicking on the Google Translate icon.
- You can move forward and back through the strings by clicking the Next and Previous buttons.
- You can navigate directly to a particular string by clicking it's string number on the far left.
- You can mark a translation as Fuzzy if you think there could be a better way to say something. This will mark it so it can be found and updated later. Remember that only submitted strings will be commited to the localization's repository, not fuzzy strings. If strings remain marked as fuzzy, the source string will appear in your localized version instead of a translated string.
- You can add notes about a particular string in the Translator Comments section.
- When translating a string with both singular and plural forms you will see two boxes on the right hand side. The box for the singular form is labeled Plural Form 0 and the box for the plural form is labeled Plural Form 1.
Additional tasks
If you are a localizer with approval priviledges, here are a few more tasks that you should be aware of.
Review suggested translations
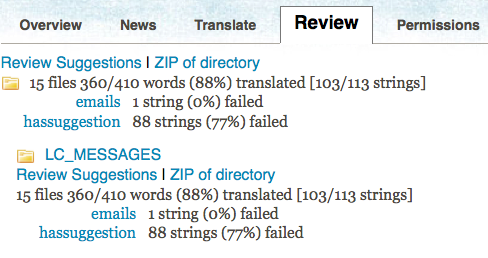
- Click on the Review tab. It will show how many strings are waiting for review for each
.pofile.
- Select Review suggestions to start approving suggestions. It will take you to the first string that needs to be reviewed.
- You can accept the suggestion by clicking the green checkmark or reject the suggestion by clicking the red X (see the screen shot from the previous section).
It is important to note that only submitted strings will appear in your localized pages. Neither suggestions nor fuzzy strings will appear. Before commiting your final localized product, make sure all strings have been submitted.
Using VCS on Verbatim
VCS (Version Control System) is the repository system we use to update the project's strings as well as push your translated content onto the web. The difference between the two tasks is simply a matter of which link to click.
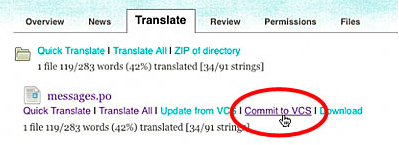
 To push your strings onto the web and see your changes, simply select the Commit to VCS link underneath each file name. It usually takes about an hour before you can see your changes on the project site.
To update your .po files with new untranslated strings, simple select the Update from VCS link underneath each file name.
Note: Some projects are automatically updated nightly while others require you to manually update them to receive new source content. Be sure to pay close attention to this, as it can alter your workflow.
Translating Verbatim files with an external application
While in the Translate tab, you have the option to export the .po and .xliff files and translate the strings with an external application (i.e., a text editor or translation memory tool).
- To download the
.pofile, select the Download link found underneath each file name. To download the .xlifffile, select the Download XLIFF link. - Proceed to translate the strings using your selected tool.
Once you've finished your translations, you'll need to upload your file to Verbatim. You can do this from the Translate tab.
- Navigate to the bottom of the files list to the Upload File section.
- Click on the Browse button and select the file you wish to upload.
- Select an upload setting from the options provided.
- Once your upload setting has been selected, click Upload.
Important: There have been some problems in the past with community members updating their source strings while others are in the process of localizing the previous updated files. This can cause community members to overlook new source strings, producing untranslated strings in a localized project. Be sure to coordinate these manual updates within your community to avoid this problem.
You're ready to go!
Whew! You've arrived at the end! Time to take what you've learned and put it to good use spreading Mozilla to everyone in your region. Have fun and let us know if you run into any difficulties. We'll be happy to help in any way we can.
