« CSS « CSS z-index 이해하기
쌓임 맥락 예제3
마지막 예제는 멀티 레벨 HTML 계층 구조에서 z-index 속성 값을 지정할때 생기는 문제에 대해 다룰 것이다.
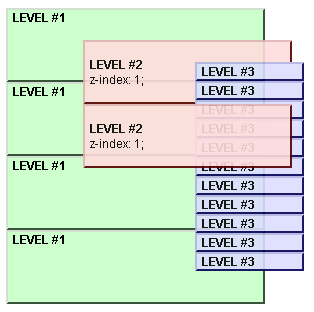
몇개의 position 속성 값이 지정된 3-레벨 계층 메뉴를 생각하자. 두번째 레벨과 세번째 레벨의 메뉴는 그들의 부모에 마우스를 갖다 대거나 클릭했을 때 보인다. 이 메뉴를 클래스 선택자를 통해 스타일링 해보자.
만약 세 메뉴가 부분적으로 겹친다면 쌓임을 해결하는 것이 문제가 된다.

첫번째 레벨 메뉴는 position 속성 값만이 relative로 지정되어있다. 따라서 이는 쌓임 맥락을 형성하지 않는다. (역자: z-index 속성 값을 지정하지 않았다.)
두번째 레벨 메뉴는 position 속성 값이 absolute로 지정되었다. 두번째 레벨 메뉴를 모든 첫번째 레벨 메뉴보다 위에 두기 위해서 z-index 속성 값이 사용되었다. 따라서 모든 두번째 레벨 메뉴에 쌓임 맥락이 생성되고 세번째 레벨 메뉴는 부모의 쌓임 맥락에 속하게 된다.
따라서 세번째 레벨 메뉴는 그 부모의 다음 두번째 레벨 메뉴 아래에 놓이게 된다. 왜냐하면 모든 두번째 레벨 메뉴는 같은 z-index 속성 값을 가지고 기본 쌓임 규칙을 적용받기 때문이다. (역자: 같은 z-index 속성 값을 가지는 형제 엘리먼트들은 HTML 문서상에서 나중에 등장한 것이 위에 쌓인다.)
이 상황을 더 잘 이해하기 위해 쌓임 맥락 계층 구조를 그려보자.
- 뿌리 엘리먼트 쌓임 맥락
- LEVEL #1
- LEVEL #2 (z-index: 1)
- LEVEL #3
- ...
- LEVEL #3
- LEVEL #2 (z-index: 1)
- ...
- LEVEL #2 (z-index: 1)
- LEVEL #2 (z-index: 1)
- LEVEL #1
- ...
- LEVEL #1
- LEVEL #1
이 문제를 해결하는 방법에는 1) 서로 다른 메뉴를 겹치지 않게 배치하기, 2) 클래스 선택자 뿐만 아니라 id 선택자를 이용하여 각각의 엘리먼트에 z-index 속성 값을 지정하기, 3) HTML 구조를 단순화하여 멀티 레벨 메뉴를 사용하지 않기 등이 있다.
예제 소스 코드
<!DOCTYPE html PUBLIC "-//W3C//DTD XHTML 1.0 Transitional//EN"
"https://www.w3.org/TR/xhtml1/DTD/xhtml1-transitional.dtd">
<html>
<head><style type="text/css">

div { font: 12px Arial; }

span.bold { font-weight: bold; }

div.lev1 {
   width: 250px;
   height: 70px;
   position: relative;
   border: 2px outset #669966;
   background-color: #ccffcc;
   padding-left: 5px;
}

#container1 {
   z-index: 1;
   position: absolute;
   top: 30px;
   left: 75px;
}

div.lev2 {
   opacity: 0.9;
   width: 200px;
   height: 60px;
   position: relative;
   border: 2px outset #990000;
   background-color: #ffdddd;
   padding-left: 5px;
}

#container2 {
   z-index: 1;
   position: absolute;
   top: 20px;
   left: 110px;
}

div.lev3 {
   z-index: 10;
   width: 100px;
   position: relative;
   border: 2px outset #000099;
   background-color: #ddddff;
   padding-left: 5px;
}

</style></head>

<body>

<br />

<div class="lev1">
<span class="bold">LEVEL #1</span>

   <div id="container1">

      <div class="lev2">
      <br /><span class="bold">LEVEL #2</span>
      <br />z-index: 1;

         <div id="container2">

            <div class="lev3"><span class="bold">LEVEL #3</span></div>
            <div class="lev3"><span class="bold">LEVEL #3</span></div>
            <div class="lev3"><span class="bold">LEVEL #3</span></div>
            <div class="lev3"><span class="bold">LEVEL #3</span></div>
            <div class="lev3"><span class="bold">LEVEL #3</span></div>
            <div class="lev3"><span class="bold">LEVEL #3</span></div>
            <div class="lev3"><span class="bold">LEVEL #3</span></div>
            <div class="lev3"><span class="bold">LEVEL #3</span></div>
            <div class="lev3"><span class="bold">LEVEL #3</span></div>
            <div class="lev3"><span class="bold">LEVEL #3</span></div>
            <div class="lev3"><span class="bold">LEVEL #3</span></div>

         </div>

      </div>

      <div class="lev2">
      <br /><span class="bold">LEVEL #2</span>
      <br />z-index: 1;
      </div>

   </div>
</div>

<div class="lev1">
<span class="bold">LEVEL #1</span>
</div>

<div class="lev1">
<span class="bold">LEVEL #1</span>
</div>

<div class="lev1">
<span class="bold">LEVEL #1</span>
</div>

</body></html>
See also
- Stacking without z-index : Default stacking rules
- Stacking and float : How floating elements are handled
- Adding z-index : Using z-index to change default stacking
- The stacking context : Notes on the stacking context
- Stacking context example 1 : 2-level HTML hierarchy, z-index on the last level
- Stacking context example 2 : 2-level HTML hierarchy, z-index on all levels
Original Document Information
- Author(s): Paolo Lombardi
- This article is the english translation of an article I wrote in italian for YappY. I grant the right to share all the content under Creative Commons: Attribution-Sharealike license
- Last Updated Date: July 9th, 2005