This article needs a technical review. How you can help.
This chapter provides basic setup information for the Gecko Software Development Kit (SDK) used to build the WebLock component in this tutorial. The following four sections tell the developer how to download and organize the Gecko SDK and create a new project in which components like WebLock can be created.
Downloading and Setting the SDK
The Gecko SDK provides all of the tools, headers, and libraries that you need to build XPCOM Components. The SDK is available for Windows, Linux, and Mac operating systems, and versions for other operating systems are being developed, and can be retrieved from as a single archive from the following platform-specific locations (Need correction for last version (now 1.9.2.8). There is now separate archive with gecko-sdk, just xul-runner-sdk.):
- Linux: https://ftp.mozilla.org/pub/mozi....8.0.4.tar.bz2
- Windows: https://ftp.mozilla.org/pub/mozi...vc-1.8.0.4.zip
- Mac: https://ftp.mozilla.org/pub/mozi...ac-1.8.0.4.zip
Note that the version number for the archives above is 1.8. The WebLock component was built with version 1.4a, which is no longer available. You may want to check for newer versions at
- Gecko versions prior to 1.7: https://ftp.mozilla.org/pub/mozi...illa/releases/
- Gecko versions after 1.8: https://ftp.mozilla.org/pub/mozi...nner/releases/
Once you download the SDK, you can expand it into any convenient location. In this appendix, we set up the Windows Gecko SDK in c:\gecko-sdk\. If you choose some other location, remember to adjust the settings described here (e.g., in the Building a Microsoft Visual Cpp Project section below) to point to this new location.
When you extract the SDK, it should have the layout seen below:
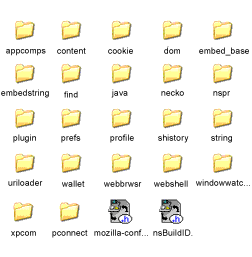
The directories represent different modules in the SDK. For example, the headers for networking are all located in the necko directory, and the headers that XPCOM requires are in the XPCOM directory. This directory structure makes build scripts slightly more complicated (since there will be many different include paths), but it helps to organize the parts of the SDK meaningfully.
The two top level header files are special. The file mozilla-config.h lists all of the defines used in the SDK. Including this header file in your project ensures that the component you create uses the same defines as the Gecko libraries themselves. Note that mozilla-config.h may be need to be included before other includes in your component's source code.
Each module directory is divided into three subdirectories:

The bin directory contains static libraries, dynamic libraries, and in some cases tools that may be useful in development. The idl directory contains the public IDL files exported by the module. The includes directory contains C++ header files used by your component.
XPCOM exports a number of binaries that should be mentioned at this point. The table below refers to the Windows file names for the executables.
| Application Name | Description of functionality |
regxpcom.exe |
Registers or Unregisters components with XPCOM |
xpidl.exe |
Generates typelib and C++ headers from XPIDL |
xpt_dump.exe |
Prints out information about a given typelib |
xpt_link.exe |
Combines multiple typelibs into a single typelib |
| Library Name | Description of functionality |
xpcomglue.lib |
XPCOM Glue library to be used by xpcom components. |
Building a Microsoft Visual Cpp Project
Once you set up the Gecko SDK, you can create a Microsoft Visual C++ project to handle component development with the SDK.
Creating a New Project
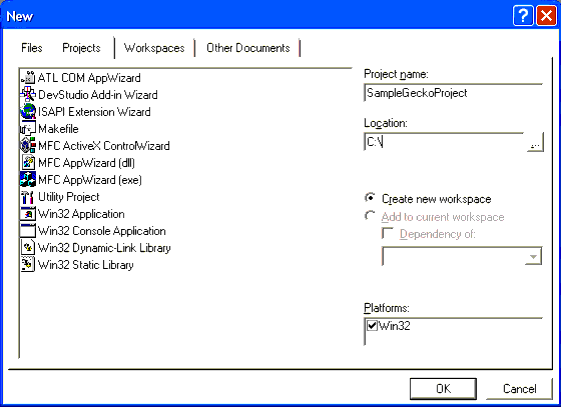
After launching Visual C++, select New from the File menu. Then, from the New dialog, select "Win32 Dynamic-Link Library". Use the fields to the right of the dialog to name your project and set its location. (This example uses "SampleGeckoProject" as the project name and C:\ as its location.). (Need correction for last Visual C++. Now it's Microsoft Visual C++ 2010. Express edition is free.)
Select OK. In the Win32 Dynamic-Link Library dialog that displays (see below), you can choose the default selection "An Empty DLL Project" as the type of DLL.
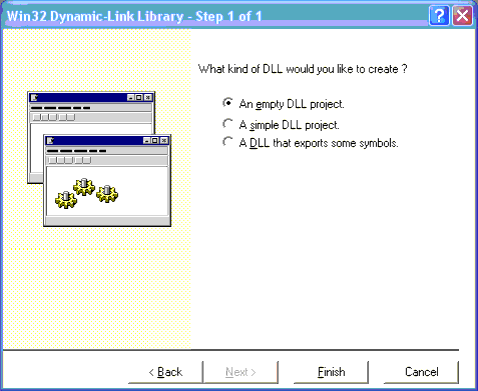
In this dialog, click Finish. Microsoft Studio creates a new project per your specification and presents you with the standard Project view.
Adding the Gecko SDK to the Project Settings
In order to build anything that uses Gecko, you have to further modify the project so that it knows where to find the Gecko SDK on the disk. To edit project settings, select Settings from the Project menu (or press Alt-F7).
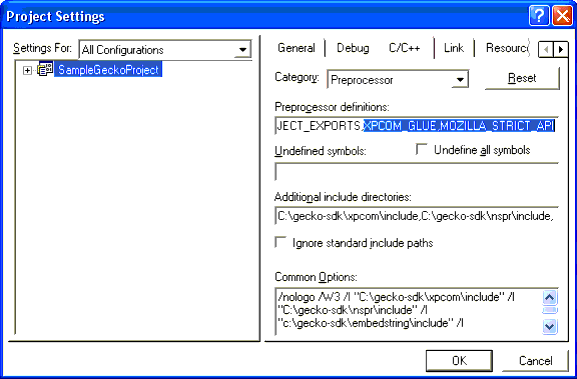
Most of the changes you make in the following steps apply to all configurations of the project (both Debug and Optimized), so select "All Configurations" from the Settings For dropdown menu:
On the C/C++ tab, select the Preprocessor category. This window is where you add the include paths to the Gecko SDK as well as two preprocessor defines:
XPCOM_GLUEMOZILLA_STRICT_API
At a minimum, you must include the nspr, the embedstring and string include directories, and the xpcom include subdirectory. If your component will use other parts of the SDK (e.g., necko), you will have to add these include directories to this field as well.
Assuming you are using the example location for your project, these paths are the following:
c:\gecko-sdk\embedstring\includec:\gecko-sdk\xpcom\includec:\gecko-sdk\nspr\includec:\gecko-sdk\string\include
Under the C++ language category, disable exception handling. As described in the section Exceptions in XPCOM, exception handling isn't supported across interface boundaries, so setting this option may catch problems during development.
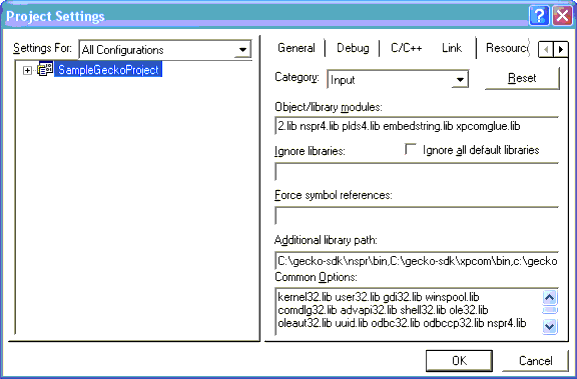
The WebLock component needs to link against the appropriate libraries to uses XPCOM Glue. To add these libraries, select the Link tab, then choose the Input category. In this panel, instead of linking to the include subdirectories of the nspr, embedstring, and xpcom directories, add the paths to the bin subdirectories.
We also link against a number of libraries in the Object/library modules line:
nspr4.libplds4.libplc4.libembedstring.libxpcomglue.lib
Both of these settings are shown below:
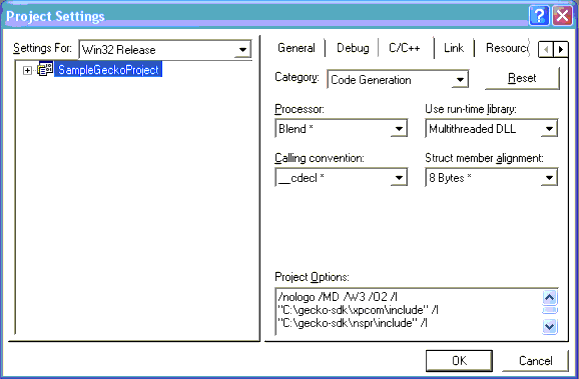
The last change you need to make to set up the Gecko SDK in your project is to change the "Use run-time library" setting to "Multithreaded DLL." Since this change is configuration dependent, you must make set the Release configuration run-time library to the release multithreaded DLL runtime and the Debug configuration to the debug multithreaded dll runtime (this needs clarification):
After making these changes, press OK. This finalizes the project settings and gives you a project that will hold and compile XPCOM Components.
Building a Windows Project
This section is writting for those of you who do not wish to install Visual Studio or the Express Edition, allowing the user to be able to create commercial extensions without buying the full version of Visual Studio and allowing them to use their own editors. First, you need to get the sdk, this project uses the following tools to compile the extension for use.
Tools Needed
- Gecko 1.9.2 sdk: https://releases.mozilla.org/pub/mozi....win32.sdk.zip
- Windows Platform SDK: https://www.microsoft.com/downloads/e...displaylang=en
- moztools: https://ftp.mozilla.org/pub/mozilla.o...8-moztools.zip
The windows platform SDK has the c++ compiler/linker needed, moztools has several tools and libraries needed for this example.
Setting up the tools
This is probably the most difficult part. Install the Microsoft SDK, change all further in this example from C:\Program Files (x86)\ to C:\Program Files\ if you are running a 32-bit version of windows instead of a 64-bit. Uncompress the Gecko SDK, this example uses D:\Projects\xulrunner-sdk\. Uncompress make.exe, libIDL-0.6.dll, glib-1.2.dll to the SDK's bin directory, D:\Projects\xulrunner-sdk\bin.
Environment setup
You can create a batch file to set up the environment for you, but this example tells you from the Command Prompt.
set INCLUDE=C:\Program Files\Microsoft SDKs\Windows\v7.0\Include;C:\Program Files (x86)\Microsoft Visual Studio 9.0\VC\include;D:\Projects\xulrunner-sdk\include
This sets up the compiler to know where included code files are, it looks in the platform sdk, visual studio 9.0 include (installed with the platform sdk), and the gecko sdk includes.
set LIB=C:\Program Files\Microsoft SDKs\Windows\v7.0\Lib;C:\Program Files (x86)\Microsoft Visual Studio 9.0\VC\lib;D:\Projects\xulrunner-sdk\lib
This tells the linker where the default libraries to bind to are. This allows you to created the component without sending any extra DLLs
set PATH=%PATH%;D:\Projects\xulrunner-sdk\sdk\bin;D:\Projects\xulrunner-sdk\bin
this tells the command prompt where to find the gecko tools, importantly (xpidl, regxpcom, and gmake).
Building the Sample
Built sample in D:\Projects\sample
The IDL
This step is fairly straight forward. First create the IDL file.
ISpecialThing.idl

#include "nsISupports.idl"

[scriptable, uuid(263ed1ba-5cc1-11db-9673-00e08161165f)]
interface ISpecialThing : nsISupports
{
  attribute AString name;

  long add(in long a, in long b);
};
Next is to build the .h file to compile against and the .xpt for gecko to understand your new interface.
xpidl -m header ISpecialThing.idl
xpidl -m typelib ISpecialThing.idl
The Code
Add the main code, the real work horse.
CSpecialThing.h

#ifndef __SPECIALTHING_IMPL_H__
#define __SPECIALTHING_IMPL_H__

#include "ISpecialThing.h"
#include "nsStringAPI.h"

#define SPECIALTHING_CONTRACTID "@starkravingfinkle.org/specialthing;1"
#define SPECIALTHING_CLASSNAME "SpecialThing"
#define SPECIALTHING_CID { 0x245626, 0x5cc1, 0x11db, { 0x96, 0x73, 0x0, 0xe0, 0x81, 0x61, 0x16, 0x5f } }

class CSpecialThing : public ISpecialThing
{
public:
    NS_DECL_ISUPPORTS
    NS_DECL_ISPECIALTHING

    CSpecialThing();

private:
    ~CSpecialThing();

protected:
    /* additional members */
    nsString mName;
};

#endif
CSpecialThing.cpp

#include "CSpecialThing.h"

NS_IMPL_ISUPPORTS1(CSpecialThing, ISpecialThing)

CSpecialThing::CSpecialThing()
{
    /* member initializers and constructor code */
    mName.Assign(L"Default Name");
}

CSpecialThing::~CSpecialThing()
{
    /* destructor code */
}

/* attribute AString name; */
NS_IMETHODIMP CSpecialThing::GetName(nsAString & aName)
{
    aName.Assign(mName);
    return NS_OK;
}
NS_IMETHODIMP CSpecialThing::SetName(const nsAString & aName)
{
    mName.Assign(aName);
    return NS_OK;
}

/* long add (in long a, in long b); */
NS_IMETHODIMP CSpecialThing::Add(PRInt32 a, PRInt32 b, PRInt32 *_retval)
{
    *_retval = a + b;
    return NS_OK;
}
This is generally your code. Next is the module code, this code is the entry point into your dll/component.
#include "nsIGenericFactory.h"
#include "CSpecialThing.h"

NS_GENERIC_FACTORY_CONSTRUCTOR(CSpecialThing)

static nsModuleComponentInfo components[] =
{
{
SPECIALTHING_CLASSNAME,
SPECIALTHING_CID,
SPECIALTHING_CONTRACTID,
CSpecialThingConstructor,
}
};

NS_IMPL_NSGETMODULE("SpecialThingsModule", components)
Next step is a Makefile for gmake.
Makefile

CC=cl.exe
CCPARMS=/D "XP_WIN" /D "XP_WIN32"

all: CSpecialThing.obj CSpecialThingModule.obj link

CSpecialThing.obj:
    $(CC) $(CCPARMS) /c CSpecialThing.cpp

CSpecialThingModule.obj:
    $(CC) $(CCPARMS) /c CSpecialThingModule.cpp

link:
    link.exe /DLL /out:"CSpecialThing.dll" /implib:"CSpecialThing.lib" /machine:I386 xpcom.lib xpcomglue_s.lib nspr4.lib "CSpecialThing.obj" "CSpecialThingModule.obj"

clean:
    del *.lib *.dll *.obj *.exp
Please note, this makefile is only for compiling the sample, you will probably have more .lib files if you are linking against winapi functions like kernel32.lib, user32.lib, etc. Also, if you notice, this turns on "XP_WIN" and "XP_WIN32" definitions, this allows XP and onward support.
To build the component, just type "gmake", to clean up files run "gmake clean".
Installing Component
This if for manually installing the component for testing. I used a different firefox profile for testing purposes called extensions. Copy the .dll file to your extensions directory. %APPLICATIONDATA%\Mozilla\Firefox\Profiles\x.extensions\extensions\[email protected]. Then copy the .xpt file to the C:\Program Files (x86)\Mozilla Firefox\components directory. Next run the regxpcom to registister the component in firefox (this writes to the complist.dat file in your profile)
regxpcom -x "C:\Program Files (x86)\Mozilla Firefox\" -c "C:\Users\<user>\AppData\Roaming\Mozilla\Firefox\Profiles\<profile>\compreg.dat" -d "C:\Users\<user>\AppData\Roaming\Mozilla\Firefox\Profiles\<profile>\xpti.dat" "C:\Users\<user>\AppData\Roaming\Mozilla\Firefox\Profiles\<profile>\extensions\[email protected]\CSpecialThing.dll"
Now if you start up firefox using that profile, you should have your new component installed. I used XPCOMViewer, to make sure the class and the interface were showing. Now you can use this component in your javascript extension.
A Makefile for Unix
On Linux, the equivalent project settings are typically handled in a Makefile. The Makefile allows you to specify any number of options for your build environment, including the path and configuration updates you need to build with the Gecko SDK.
Below is a listing for a Makefile that configures your compiler to work with the SDK. Explaining the details of the Makefile is outside the scope of this appendix, but it modifies the same properties that are configured in the Visual C++ project (see Building a Microsoft Visual Cpp Project). For a listing of the commands that appear in this listing, see the Make manual.
Sample Makefile for the Gecko SDK
MODULE		= MozShim

# Change this to point at your Gecko SDK directory.
GECKO_SDK_PATH ?= $(HOME)/tmp/xr

XPIDL	       ?= $(GECKO_SDK_PATH)/bin/xpidl

CXX	       ?= c++

XPIDLSRCS	= \
		InterfaceA.idl \
		InterfaceB.idl \
		$(NULL)

CPPSRCS		= \
		SourceA.cpp \
		SourceB.cpp \
		$(NULL)

CPPFLAGS +=     -fno-rtti		\
                -fno-exceptions		\
                -fshort-wchar		\
		-fPIC			\
		$(NULL)

# GCC only define which allows us to not have to #include mozilla-config
# in every .cpp file.  If your not using GCC remove this line and add
# #include "mozilla-config.h" to each of your .cpp files.
GECKO_CONFIG_INCLUDE = -include mozilla-config.h

GECKO_DEFINES  = -DMOZILLA_STRICT_API

GECKO_INCLUDES = -I$(GECKO_SDK_PATH)                    \
                 -I$(GECKO_SDK_PATH)/idl                \
                 -I$(GECKO_SDK_PATH)/include            \
                 -I$(GECKO_SDK_PATH)/xpcom/include      \
                 -I$(GECKO_SDK_PATH)/nspr/include       \
                 -I$(GECKO_SDK_PATH)/string/include     \
                 -I$(GECKO_SDK_PATH)/embedstring/include

GECKO_LDFLAGS =  -L$(GECKO_SDK_PATH)/bin \
		 -L$(GECKO_SDK_PATH)/lib \
		 -lxpcomglue_s	\
                 -lnspr4	\
                 -lplds4	\
		 -lxul		\
		 -shared	\
		 $(NULL)

%.h: %.idl
	$(XPIDL) -m header $(GECKO_INCLUDES) $<

%.xpt: %.idl
	$(XPIDL) -m typelib $(GECKO_INCLUDES) $<

%.o: %.cpp Makefile
	$(CXX) -c $(CPPFLAGS) $(CXXFLAGS) $(GECKO_CONFIG_INCLUDE) $(GECKO_DEFINES) $(GECKO_INCLUDES) $<

$(MODULE).so: $(XPIDLSRCS:%.idl=%.h) $(XPIDLSRCS:%.idl=%.xpt) $(CPPSRCS:%.cpp=%.o)
	$(CXX) -o $@ -Wl,-soname=$(MODULE).so $(CPPSRCS:%.cpp=%.o) $(GECKO_LDFLAGS)
	chmod +x $@

build: $(MODULE).so

clean:
	rm $(MODULE).so
Copyright (c) 2003 by Doug Turner and Ian Oeschger. This material may be distributed only subject to the terms and conditions set forth in the Open Publication License, v1.02 or later. Distribution of substantively modified versions of this document is prohibited without the explicit permission of the copyright holder. Distribution of the work or derivative of the work in any standard (paper) book form is prohibited unless prior permission is obtained from the copyright holder.