canvas更有意思的一项特性就是图像操作能力。可以用于动态的图像合成或者作为图形的背景,以及游戏界面(Sprites)等等。浏览器支持的任意格式的外部图片都可以使用,比如PNG、GIF或者JPEG。 你甚至可以将同一个页面中其他canvas元素生成的图片作为图片源。
引入图像到canvas里需要以下两步基本操作:
- 获得一个指向{{domxref("HTMLImageElement")}}的对象或者另一个canvas元素的引用作为源,也可以通过提供一个URL的方式来使用图片(参见例子)
- 使用
drawImage()函数将图片绘制到画布上
我们来看看具体是怎么做的。
获得需要绘制的图片
canvas的API可以使用下面这些类型中的一种作为图片的源:
{{domxref("HTMLImageElement")}}
这些图片是由Image()函数构造出来的,或者任何的{{HTMLElement("img")}}元素
{{domxref("HTMLVideoElement")}}
用一个HTML的 {{HTMLElement("video")}}元素作为你的图片源,可以从视频中抓取当前帧作为一个图像
{{domxref("HTMLCanvasElement")}}
可以使用另一个 {{HTMLElement("canvas")}} 元素作为你的图片源。
{{domxref("ImageBitmap")}}
这是一个高性能的位图,可以低延迟地绘制,它可以从上述的所有源以及其它几种源中生成。
这些源统一由 {{domxref("CanvasImageSource")}}类型来引用。
有几种方式可以获取到我们需要在canvas上使用的图片。
使用相同页面内的图片
我们可以通过下列方法的一种来获得与canvas相同页面内的图片的引用:
- {{domxref("document.images")}}集合
- {{domxref("document.getElementsByTagName()")}}方法
- 如果你知道你想使用的指定图片的ID,你可以用{{domxref("document.getElementById()")}}获得这个图片
使用其它域名下的图片
在 {{domxref("HTMLImageElement")}}上使用crossOrigin属性,你可以请求加载其它域名上的图片。如果图片的服务器允许跨域访问这个图片,那么你可以使用这个图片而不污染canvas,否则,使用这个图片将会污染canvas。
使用其它 canvas 元素
和引用页面内的图片类似地,用 document.getElementsByTagName 或 document.getElementById 方法来获取其它 canvas 元素。但你引入的应该是已经准备好的 canvas。
一个常用的应用就是将第二个canvas作为另一个大的 canvas 的缩略图。
由零开始创建图像
或者我们可以用脚本创建一个新的 {{domxref("HTMLImageElement")}} 对象。要实现这个方法,我们可以使用很方便的Image()构造函数。
var img = new Image();   // 创建一个img元素
img.src = 'myImage.png'; // 设置图片源地址
当脚本执行后,图片开始装载。
若调用 drawImage 时,图片没装载完,那什么都不会发生(在一些旧的浏览器中可能会抛出异常)。因此你应该用load时间来保证不会在加载完毕之前使用这个图片:
var img = new Image();   // 创建img元素
img.onload = function(){
  // 执行drawImage语句
}
img.src = 'myImage.png'; // 设置图片源地址
如果你只用到一张图片的话,这已经够了。但一旦需要不止一张图片,那就需要更加复杂的处理方法,但图片预装载策略超出本教程的范围,感兴趣的话可以参考JavaScript Image Preloader。
通过 data: url 方式嵌入图像
我们还可以通过 data: url 方式来引用图像。Data urls 允许用一串 Base64 编码的字符串的方式来定义一个图片。
var img_src = 'data:image/gif;base64,R0lGODlhCwALAIAAAAAA3pn/ZiH5BAEAAAEALAAAAAALAAsAAAIUhA+hkcuO4lmNVindo7qyrIXiGBYAOw==';
其优点就是图片内容即时可用,无须再到服务器兜一圈。(还有一个优点是,可以将 CSS,JavaScript,HTML 和 图片全部封装在一起,迁移起来十分方便。)缺点就是图像没法缓存,图片大的话内嵌的 url 数据会相当的长:
使用视频帧
你还可以使用{{HTMLElement("video")}} 中的视频帧(即便视频是不可见的)。例如,如果你有一个ID为“myvideo”的{{HTMLElement("video")}} 元素,你可以这样做:
function getMyVideo() {
  var canvas = document.getElementById('canvas');
  if (canvas.getContext) {
    var ctx = canvas.getContext('2d');

    return document.getElementById('myvideo');
  }
}
它将为这个视频返回{{domxref("HTMLVideoElement")}}对象,正如我们前面提到的,它可以作为我们的Canvas图片源。
绘制图片
一旦获得了源图对象,我们就可以使用 drawImage 方法将它渲染到 canvas 里。drawImage 方法有三种形态,下面是最基础的一种。
drawImage(image, x, y)
其中 image 是 image 或者 canvas 对象,x 和 y 是其在目标 canvas 里的起始坐标。
例子:一个简单的线图
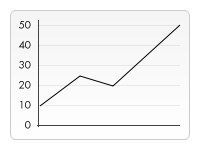
下面一个例子我用一个外部图像作为一线性图的背景。用背景图我们就不需要绘制负责的背景,省下不少代码。这里只用到一个 image 对象,于是就在它的 onload 事件响应函数中触发绘制动作。drawImage 方法将背景图放置在 canvas 的左上角 (0,0) 处。
  function draw() {
    var ctx = document.getElementById('canvas').getContext('2d');
    var img = new Image();
    img.onload = function(){
      ctx.drawImage(img,0,0);
      ctx.beginPath();
      ctx.moveTo(30,96);
      ctx.lineTo(70,66);
      ctx.lineTo(103,76);
      ctx.lineTo(170,15);
      ctx.stroke();
    }
    img.src = 'images/backdrop.png';
  }
结果看起来是这样的:
{{EmbedLiveSample("Example.3A_A_simple_line_graph", 220, 160, "https://mdn.mozillademos.org/files/206/Canvas_backdrop.png")}}
缩放 Scaling
The second variant of the drawImage method adds two new parameters and it allows us to place scaled images on the canvas.
drawImage 方法的又一变种是增加了两个用于控制图像在 canvas 中缩放的参数。
drawImage(image, x, y, width, height)
Where width and height is the image's size on the target canvas. 当中 width 和 height 分别是图像在 canvas 中显示大小。
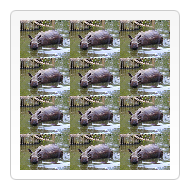
drawImage 示例 2
 In this example I'm going to use an image as a wallpaper and repeat it several times on the canvas. This is done simply by looping and placing the scaled images at different positions. In the code below the first
 for loops through the rows the second for loop the columns. The image is scaled one third of its original size which is 50x38 pixels. We'll see how this could also have been achieved, by creating a custom pattern, later in this tutorial.
在这个例子里,我会用一张图片像背景一样在 canvas 中以重复平铺开来。实现起来也很简单,只需要循环铺开经过缩放的图片即可。见下面的代码,第一层 for 循环是做行重复,第二层是做列重复的。图像大小被缩放至原来的三分之一,50x38 px。这种方法可以用来很好的达到背景图案的效果,在下面的教程中会看到。
Note: Images can become blurry when scaling up or grainy if they're scaled down too much. Scaling is probably best not done if you've got some text in it which needs to remain legible.
注意:图像可能会因为大幅度的缩放而变得起杂点或者模糊。如果您的图像里面有文字,那么最好还是不要进行缩放,因为那样处理之后很可能图像里的文字就会变得无法辨认了。

  function draw() {
    var ctx = document.getElementById('canvas').getContext('2d');
    var img = new Image();
    img.onload = function(){
      for (i=0;i<4;i++){
        for (j=0;j<3;j++){
          ctx.drawImage(img,j*50,i*38,50,38);
        }
      }
    }
    img.src = 'images/rhino.jpg';
  }
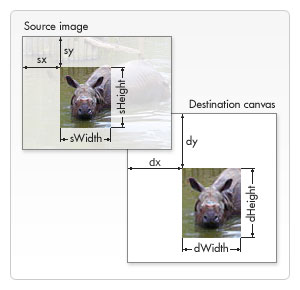
切片 Slicing
The third and last variant of the drawImage method has eight new parameters. We can use this method to slice parts of a source image and draw them to the canvas.
drawImage 方法的第三个也是最后一个变种有8个新参数,用于控制做切片显示的。
drawImage(image, sx, sy, sWidth, sHeight, dx, dy, dWidth, dHeight)
 The first parameter
 image, just as with the other variants, is either a reference to an image object or a reference to a different canvas element. For the other eight parametes it's best to look at the image on the right. The first four parameters define the location and size of the slice on the source image. The last four parameters define the position and size on the destination canvas.
第一个参数和其它的是相同的,都是一个图像或者另一个 canvas 的引用。其它8个参数最好是参照右边的图解,前4个是定义图像源的切片位置和大小,后4个则是定义切片的目标显示位置和大小。
Slicing can be a useful tool when you want to make compositions. You could have all elements in a single image file and use this method to composite a complete drawing. For instance, if you want to make a chart you could have a PNG image containing all the necessary text in a single file and depending on your data could change the scale of your chart without very much diffculty. Another advantage is that you don't need to load every image individually.
切片是个做图像合成的强大工具。假设有一张包含了所有元素的图像,那么你可以用这个方法来合成一个完整图像。例如,你想画一张图表,而手上有一个包含所有必需的文字的 PNG 文件,那么你可以很轻易的根据实际数据的需要来改变最终显示的图表。这方法的另一个好处就是你不需要单独装载每一个图像。
drawImage 示例 3
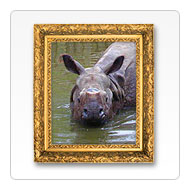 In this example I'm going to use the same rhino as we've seen above, but now I'm going to slice its head out and composite it into a picture frame. The image of the picture frame includes a dropshadow which has been saved as a 24-bit PNG image. Because 24-bit PNG images include a full 8-bit alpha channel, unlike GIF and 8-bit PNG images, I can place it onto any background and don't have to worry about a matte color.
在这个例子里面我用到上面已经用过的犀牛图像,不过这次我要给犀牛头做个切片特写,然后合成到一个相框里面去。相框带有阴影效果,是一个以 24-bit PNG 格式保存的图像。因为 24-bit PNG 图像带有一个完整的 8-bit alpha 通道,与 GIF 和 8-bit PNG 不同,我可以将它放成背景而不必担心底色的问题。
I took a different approach to the loading of the images than the example above. I just placed the images directly in my HTML document and used a CSS rule to hide them from view (display:none). I assigned both images an id attribute to make them easier to select. The script itself is very simple. I first draw the sliced and scaled image on the canvas (first drawImage statement), and then place the frame on top (second drawImage statement).
我用一个与上面用到的不同的方法来装载图像,直接将图像插入到 HTML 里面,然后通过 CSS 隐藏(display:none)它。两个图像我都赋了 id ,方便后面使用。看下面的脚本,相当简单,首先对犀牛头做好切片(第一个 drawImage )放在 canvas 上,然后再上面套个相框(第二个 drawImage )。

function draw() {
  var canvas = document.getElementById('canvas');
  var ctx = canvas.getContext('2d');

  // Draw slice
  ctx.drawImage(document.getElementById('source'),
                33,71,104,124,21,20,87,104);

  // Draw frame
  ctx.drawImage(document.getElementById('frame'),0,0);
}
示例:画廊 Art gallery example
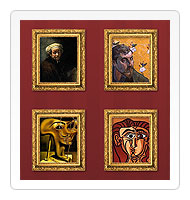 In the final example of this chapter I've made a little art gallery. The gallery consists of a table containing several images. When the page is loaded, for each image in the page a canvas element is inserted and a frame is drawn arround it.
我这一章最后的示例是弄一个小画廊。画廊由挂着几张画作的格子组成。当页面装载好之后,为每张画创建一个 canvas 元素并用加上画框然后插入到画廊中去。
In my case, all images have a fixed width and height, and so does the frame that's drawn around it. You could enhance the script so that it uses the image's width and height to make the frame fit perfectly around it.
在我这个例子里面,所有“画”都是固定宽高的,画框也是。你可以做些改进,通过脚本用画的宽高来准确控制围绕它的画框的大小。
The code below should be self-explanatory. We loop through the images array and add new canvas elements accordingly. Probably the only thing to note, for those not so familar with the DOM, is the use of the insertBefore method. insertBefore is a method of the parent node (a table cell) of the element (the image) before which we want to insert our new node (the canvas element).
下面的代码应该是蛮自我解释的了。就是遍历图像对象数组,依次创建新的 canvas 元素并添加进去。可能唯一需要注意的,对于那些并不熟悉 DOM 的朋友来说,是 insertBefore 方法的用法。insertBefore 是父节点(单元格)的方法,用于将新节点(canvas 元素)插入到我们想要插入的节点之前。
function draw() {

  // Loop through all images
  for (i=0;i<document.images.length;i++){

    // Don't add a canvas for the frame image
    if (document.images[i].getAttribute('id')!='frame'){

      // Create canvas element
      canvas = document.createElement('CANVAS');
      canvas.setAttribute('width',132);
      canvas.setAttribute('height',150);

      // Insert before the image
      document.images[i].parentNode.insertBefore(canvas,document.images[i]);

      ctx = canvas.getContext('2d');

      // Draw image to canvas
      ctx.drawImage(document.images[i],15,20);

      // Add frame
      ctx.drawImage(document.getElementById('frame'),0,0);
    }
  }
}
控制图像的缩放行为 Controlling image scaling behavior
{{ gecko_minversion_header("1.9.2") }}
Gecko 1.9.2 introduced the mozImageSmoothingEnabled property to the canvas element; if this Boolean value is false, images won't be smoothed when scaled. This property is true by default.
Gecko 1.9.2 引入了 mozImageSmoothingEnabled 属性,值为 false 时,图像不会平滑地缩放。默认是 true 。
cx.mozImageSmoothingEnabled = false;
{{PreviousNext("Web/API/Canvas_API/Tutorial/Drawing_text", "Web/API/Canvas_API/Tutorial/Transformations")}}