This page has some code snippets used to display and process dialog boxes. See Working with windows in chrome code for introductory information and more discussion and examples.
Describing dialog windows
Dialogs in Mozilla
Whenever you want to create a dialog in your application, use <dialog> (instead of usual <window>) as root element in the XUL file. This will:
- Handle a few keyboard events (ENTER/ESC and more), which is good for keyboard accessibility.
- Add OK and Cancel buttons in an order that is consistent with OS default (but the button set and layout is highly customizable, see below).
Simple dialog code
The following XUL code defines a simple dialog with two buttons, OK and Cancel (buttons="accept,cancel" attribute on dialog).
<?xml version="1.0"?>
<?xml-stylesheet href="chrome://global/skin/global.css" type="text/css"?>

<dialog xmlns="https://www.mozilla.org/keymaster/gatekeeper/there.is.only.xul"
	id="..." title="..."
	buttons="accept,cancel"
	ondialogaccept="return onAccept();"
	ondialogcancel="return onCancel();">

<script src="chrome://..."/>

<!-- Content -->

</dialog>
You need to implement onAccept and onCancel functions in your script. If they return anything but false, the dialog will be closed.
Buttons in <dialog>
Predefined
There are six button types you can use in the buttons attribute of dialog. They are:
- accept — OK button.
- cancel — Cancel button.
- disclosure — More Info button.
- help — Help button (Doesn't work in Thunderbird 1.0 bug 256915)
- extra1, extra2 — Two buttons without any predefined labels or meaning. extra2 is positioned at the left side of the dialog (by default).
For each of these buttons you can set their label, accesskey and oncommand handler by adding buttonlabel<buttonname>, buttonaccesskey<buttonname> and ondialog<buttonname> attributes to the dialog element. For example, to add an Apply button to your dialog, use the following code:
<dialog xmlns="https://www.mozilla.org/keymaster/gatekeeper/there.is.only.xul"
  id="..."
  buttons="accept,cancel,extra1"
  ondialogaccept="onAccept();"
  ondialogextra1="onApply();"
  buttonlabelextra1="Apply"
  buttonaccesskeyextra1="A">

<!-- Content -->
</dialog>
You can even get the element object for any of predefined buttons with gDialog.getButton(dlgtype);, where gDialog is the <dialog> element and dlgtype is one of the six button types listed above.
Explicit
If you are not satisfied with the layout of predefined buttons in dialog, you can put explicit button elements in your XUL file and add a dlgtype attribute to them. Valid values for dlgtype are the six button types listed above.
Be sure to use ondialog* attributes on dialog element instead of putting oncommand on the button with dlgtype, because button's oncommand is executed only when the button is pressed, and ondialog* handlers are executed for keyboard and other events too.
Example:
<?xml version="1.0"?>
<?xml-stylesheet href="chrome://global/skin/" type="text/css"?>

<dialog xmlns="https://www.mozilla.org/keymaster/gatekeeper/there.is.only.xul"
        ondialogaccept="alert('ok!');">
<hbox>
  <label value="Hey!"/>

  <spacer flex="1"/>
  <vbox>
    <button dlgtype="accept"/>
    <button dlgtype="cancel"/>
  </vbox>
</hbox>
</dialog>
Default button
Since Firefox 1.5, there are defaultButton attributes and properties on the <dialog> element bug 284776. The possible values for the attribute are the names of buttons listed above, and the default is "accept", for compatibility with previous versions.
Using <dialogheader>
You can use the dialogheader element to add "headers" to windows. To get an idea of what it looks like, open Options (or Preferences) dialog in Firefox or Thunderbird (v1.0 and earlier only). The header to the right of the sections buttons is made with <dialogheader>:
<dialogheader title="General" description="whatever"/>
Note, that you should only use this element in a <dialog>, because otherwise it may be not styled properly. (Although it seems to work in <window> as well).
Programmatic button access
If you want to access the accept ("OK") and cancel buttons from script, use this:
// Disable the OK and Cancel btns
document.documentElement.getButton("accept").disabled = true;
document.documentElement.getButton("cancel").disabled = true;
Links
- dialog.xml — XBL bindings for <dialog> and <dialogheader> elements.
- Passing parameter to a dialog and getting return values from it.
Passing arguments and displaying a dialog
The following code demonstrates how to pass custom arguments to a dialog, process those arguments in the dialog, and return user-modified arguments to the caller. The code to open a dialog named mydialog.xul and pass it arguments:
  var params = {inn:{name:"foo", description:"bar", enabled:true}, out:null};
  window.openDialog("chrome://myext/content/mydialog.xul", "",
    "chrome, dialog, modal, resizable=yes", params).focus();
  if (params.out) {
    // User clicked ok. Process changed arguments; e.g. write them to disk or whatever
  }
  else {
    // User clicked cancel. Typically, nothing is done here.
  }
mydialog.xul:
<dialog
  xmlns="https://www.mozilla.org/keymaster/gatekeeper/there.is.only.xul"
  id="myDialogId"
  title="My Dialog"
  ondialogaccept="return onOK();"
  onload="onLoad();"
  persist="screenX screenY width height"
  windowtype="myDialogWindowType">

  <script type="application/javascript" src="chrome://myext/content/mydialog.js"/>
  <grid>
    <columns><column/><column/></columns>
    <rows>
      <row align="center"><label value="Name:"/><textbox id="name"/></row>
      <row align="center"><label value="Description:"/><textbox id="description"/></row>
      <row align="center"><spacer/><checkbox id="enabled" label="Check to Enable"/></row>
    </rows>
  </grid>
</dialog>
mydialog.js:
// Called once when the dialog displays
function onLoad() {
  // Use the arguments passed to us by the caller
  document.getElementById("name").value = window.arguments[0].inn.name;
  document.getElementById("description").value = window.arguments[0].inn.description;
  document.getElementById("enabled").checked = window.arguments[0].inn.enabled;
}

// Called once if and only if the user clicks OK
function onOK() {
   // Return the changed arguments.
   // Notice if user clicks cancel, window.arguments[0].out remains null
   // because this function is never called
   window.arguments[0].out = {name:document.getElementById("name").value,
        description:document.getElementById("description").value,
        enabled:document.getElementById("enabled").checked};
   return true;
}
See also Passing parameter to a dialog and getting return values from it.
Displaying the standard "Open File"/"Save File"/"Select Folder" dialogs
Prompts and the prompt service
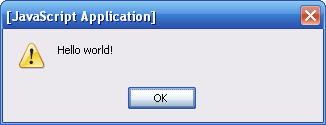
Now that you understand dialogs, let's examine prompts. Prompts differ from dialogs in that they don't require custom XUL. Because of this, however, they are less customizable. Most web developers are familiar with the alert() function:

This is a prime example of a prompt.
nsIPromptService
For file/folder picker dialogs, see nsIFilePicker
Original version
The original version of this tutorial was written by "Ihoss" (it was here).
Links
See also